| Flow chart of the program "BETA" :: Major procedures :: Minor procedures :: Program "ZOEKBAL" :: Dowloads |
Flow chart of the program "BETA"
As can be seen on the flow chart(figure XXX) the program consists of 5 major procedures: ôZOEKBALö, ôSIGNALCONTROLö, ôTRANSITIEö, ôAANVALö and ôSCHIETö. It are these major procedures which are called in de main routine of the program. Now that youĺve got an idea of the structure of the program, itĺs time to take a better look at each of those five major procedures. Afterwards, some minor procedures which are used in the major procedures will be discussed.
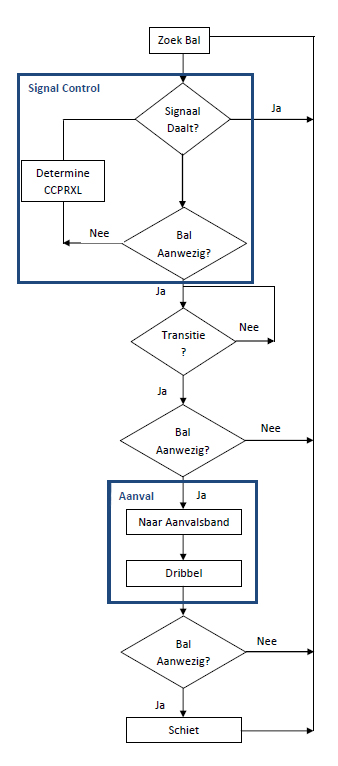
Figure 1: Flow chart
Major procedures (From BETA.asm)
Procedure "ZOEKBAL"
In this procedure, we make the robot spin around his central axis and in the mean while, we are asking the microcontroller for the results of the sensor IR_DET. We compare the last and the second last value of IR_DET and when the value decreases, we stop the spinning of the robot because we assume that at that time, the front (ôthe noseö) of the robot is pointing to the ball.
Procedure "SIGNALCONTROL"
As we assume that the nose of the robot is pointing to the ball, we order the robot to move forward until the ball is in his possession. Of course, it is possible that before the robot has the ball in its possession, the direction of the ball changes, so the robot has to change his direction as well. In order to get that done, first of all, we have detect whether the signal measured by IR_DET is decreasing or not. If it is decreasing, the robot is going away from the ball, and so we have to jump to the label ôHERBEGINö in the code. This is done by clearing the parameter ôBALILö and then returning to the main routine of the code. If the signal is not decreasing, we check if the ball is in possession of the robot with the minor procedure ôBALAANWEZIGö. (The explanation of this procedure is found in the paragraph ôMINOR PROCEDURESö.) Now there are two options. If the ball is in possession of the robot, we want to leave the procedure ôSIGNALCONTROLö with the parameter ôBALILö first set high. However, if the ball is not in possession of the robot, the robot just has got to keep moving forward, cause we know that the robot is still going in the right direction as the signal is not decreasing. The speed with which the robot keeps moving forward depends on the distance between the ball and the robot. If the robot is near to the ball, he moves slowly, otherwise he moves fast. The speed regulation happens in the minor procedure ôDETERMINECCPRXLö which is also explained in the paragraph ôMINOR PROCEDURESö. After the speed regulation has happened we want to run this procedure all over again until the ball is in possession of the robot.
Procedure "TRANSITIE"
|
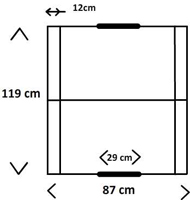
Figure 2: Play field |
When we’ve got to this point of the program, we know for sure that the robot has the ball. Next thing we want to do is making the transition from “defense” (getting the ball) to “offense”. At the end of this procedure we want the robot to point his nose towards the goal of the opponent and to be out of the merges (12cm of the side of the field) of the field. (The distance from the nose of the robot to the side of the robot is 10cm so we’ve got 2cm spacing.) The way to do this depends on the orientation of the robot. The orientation (also called “STATE” in the program) is identified in the procedure “ORIËNTATION”. (Orientation and procedure “ORIËNTATION” are as well explained in the paragraph “MINOR PROCEDURES”.) Then, depending on this state, the robot performs a programmed action (TR_CASE_0, TR_CASE_12, TR_CASE_345 or TR_CASE_67) in order to achieve the goal of this procedure: pointing the nose of the robot towards the goal of the opponent and getting the nose of the robot out of the merges. By reading the program code, you should notice that the procedure “TRANSITIE” is an iterative process so we might have to repeat this procedure a couple of times. This is implemented in the code with the parameter “TRSET” and the label “HBTRANSITIE”. When the transition is finalized, we have to make sure that the robot still has the ball in its possession. If this isn’t so, the program jumps back to the label “HERBEGIN”. Otherwise, the procedure “AANVAL” is called. |
Procedure "AANVAL"
When we arrive at this point of the program, the robot is standing still, with his nose towards the goal of the opponent. Next thing we want the robot to do, is crossing at least the first green line (figure 4). We want the robot to cross that line because the ball is quite unbalanced (which implements that the ball might change its direction after the robot shot it to the goal, if the distance between (the nose of) the robot (where the shooter is) and the target is too large.) In the program, this is done with the procedure ôNRAANVALSBANDö. However, it is possible that the robot has already crossed that line. In that case, the robot doesnĺt has to move laterally. In the procedure ôNRAANVALSBANDö, the lateral position of the robot is saved to the parameter ôAANVALSBANDö. When the procedure ôNRAANVALSBANDö is finished, there are only two options for this lateral position. The robot can stand between the first and the second green line or across the second green line.
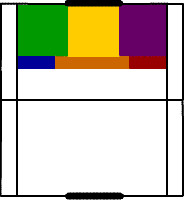
Figure 3: Planes |
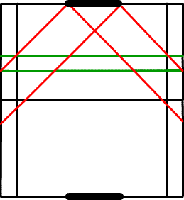
Figure 4: Dividing the field |
When the procedure ôNRAANVALSBANDö is finished, the procedure ôDRIBBELö is called. In this procedure, the program identifies in which plane (the red, orange, blue, green, yellow or purple plane) the robot stands. Depending on that plane, the robot performs one of the following five attack algorithms:
- When the robot is in the dark blue plane, the robot has to rotate 45░ CW (check the figure 4,5 to understand)
- When the robot is in the red plane, the robot has to rotate 45░ CCW (check the figure 4,5 to understand)
- When the robot is in the orange or yellow plane no action has to be done
- When the robot is in the green plane, the robot has to be moved to the yellow plane, during the movement, the robotĺs state changes. At the end of the procedure ôDRIBBELö, the robot is brought back to state 0 (the nose of the robot pointing towards the goal of the opponent).
- When the robot is in the purple plane, the robot has to be moved to the yellow plane, during the movement, the robot changes state. At the end of the procedure ôDRIBBELö, the robot is brought back to state 0 (the nose of the robot pointing towards the goal of the opponent).
When the procedure ôDRIBBELö is finished, we check ones more whether the robot still has the ball in its possession. If the robot doesnĺt possess the ball anymore, we jump back to the label ôHERBEGINö in the code. Otherwise the program moves on to the last major procedure: ôSCHIETö Remark: We have chosen to work with those planes to limit the number of attack algorithms. There are many other ways to do this.
Procedure "Schiet"
This is the last step in the program. Once we got here, we suppose the robot to be in shooting position, so all we remain to do is writing the shoot command to the microcontroller. When this is done, we go back to the procedure ôZOEKBALö. [ Top ]
Minor procedures (From BETA.asm)
Procedure "INT"
The goal of this procedure is to make us capable of adapting the side (black/white) of our goal by pushing a button on the robot. To succeed this, we certainly need an interrupt. In this procedure, the side of the goal of the opponent (and so also the side of our goal) is saved in the parameter ôTARGETö (If the parameter is set, we play to the white side, if the parameter is cleared, we play to the black side). Also a control led is set. By using this parameter, the values of the gray scale sensors are calculated (in the procedures AD_INT_GFL, AD_INT_GFR and AD_INT_GBACK) in different ways, depending on the side of the opponentĺs goal. By doing this, the calculated value of the gray sensor will always be high when the sensor is near to the opponentĺs goal and low when he is near to our goal.
Procedure "BALAANWEZIG"
In this procedure, we check if the ball is in possession of the robot or not. The result is stored in the parameter ôBALAANWö. We assume that if or IR_DET or IR_CON is higher than 4V, the ball is in possession.
Procedure "DETERMINECCPRXL"
In this procedure, we change the speed of the robot, depending on the distance between the robot and the ball. The distance is measured with the sensor IR_DET. There are three speed levels (level0: full speed, level1: 2/3 of maximum speed, level3: 1/3 of maximum speed)
Procedure "OriŰntation"
However this is a minor procedure, it is a very important one which is very commonly used during the program cycle. To understand what we are doing, you should first get an idea of how are gray sensors (GFL, GFR and GBACK) are placed on the robot. Therefore, please take a look at figure 5.

Figure 5: Top view robot grey sensors |

Figure 6: STATES of the robot |
GBACK is placed, right at the central axis of the robot. That means that if the robot turns around its central axis, GFL and GFR are describing a circle, but GBACK doesnĺt move. Knowing that, we can identify the state of the robot by comparing the values of GFL, GFR and GBACK.
| GFL = GFR > GBACK: | STATE 0 |
| GFL > GFR = GBACK: | STATE 1 |
| GFL > GBACK > GFR: | STATE 2 |
| GFL = GBACK > GFR: | STATE 3 |
| GBACK > GFL = GFR: | STATE 4 |
| GBACK = GFR > GFL: | STATE 5 |
| GFR > GBACK > GFL: | STATE 6 |
| GFR > GBACK = GFL: | STATE 7 |
In STATE 0, the nose of the robot is pointing to the goal of the opponent
Procedure "NRAANVALSBAND" and "DRIBBEL"
These are already discussed, in paragraph ôMAJOR PROCEDURES ľ AANVALö.
Remark: Several other procedures are used, but these wonĺt be discussed as they should be clear automatically. [ Top ]
During the first tests to get the robot working there were some difficulties. Because of various problems, the program didnĺt work on the robot. When we simulated the program, everything was working fine but on the robot, strange things happened. After some hours of trying to adapt the program, we decided to start over. We used the first program as a template for the new program. This new program appeared to work fine but it isnĺt complete because of lack of time. This program was made to follow the ball. After this program was made, the problems of the original program could be explained more or less. These were some reasons:
- The time between two readings of the sensor values was very short. The program has to allow this way of working. Otherwise, a delay loop is necessary.
- Sometimes, the sensor value peaks without any reason. This was something we couldnĺt explain. It is a very important fact for the progress of the program. In the new program, we obtained the sensor value and then went only once through a loop according to the value. After this loop, we obtained the value again and so on. The time between the passage throw the loops was very short. This approach allows sensor value peaks to occur occasionally without any problems.
- The original program could be to accurate. A better approach to the programming is to depend a little more on luck. This takes less computing time and it is more rigid against disturbance from for example the sensors.
A last advice: each time you write a new procedure, immediately do some tests with the robot. We didn't have that opportunity, because we had to make the robot starting from zero, but you will be able to do it in such a way. Do not write the whole code at once! [ Top ]
Feel free to download the following content:
- Discussion program (pdf-file, 361kB)
- BETA.asm (asm-file, 26kB)
- zoekbal.asm (asm-file, 61kB) [ Top ]