Instructions
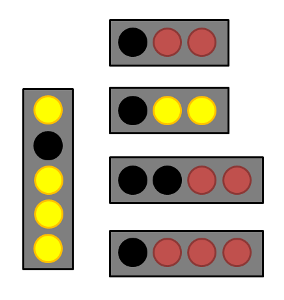
To operate our sowing robot, start by connecting all the connectors on the PCB. Notice some wires on the connectors have been colored black. The connectors should be placed in such a way, that they are in the same position as in the picture below:
Apply a voltage of 6 volts to the set-up, connect the computer with the arduino and turn on the power switch on the PCB.
Refill the seed container if necessary and place the area to be planted underneath the robot arm.
Download the necessary computer program here. The instruction are listed on the programming page on this website.
The computer program will fabricate a .pde file you need to upload onto the arduino microprocessor.
The robot will now start planting seeds automatically, or by using the joystick (depending on which option you chose earlier. To plant seeds manually, simply move the robot arm to the desired location with the joystick and press the joystick down to plant a seed.
Once you (or the robot itself) are done planting, you can remove the planted area.
Some led's are present on the PCB of the robot, the function of these led's are the following:
- servo sm ready: this led lights up when the small servo motor reaches it's final position.
- servo sm busy: this led lights up when the small servo motor is moving.
- servo big ready: this led lights up when the big servo motor reaches it's final position.
- servo big busy: this led lights up when the big servo motor is moving.
- sowing: this led will light up for a short period when a seed is planted correctly and will light up three seconds when a seed couldn't be planted.