The purpose of the graphical interface is to make it possible to design a pattern. This patter will then be sent to the Arduino board so that the robot can sow seeds in this pattern.
To create this interface we chose to use "Qt", this toolkit has the big advantage that it's supported on multiple platforms so that it is easy to create software for any operating system. This way the user isn't restricted to the Windows operating system as with other languages but can run it on any "Qt" supported device.
Code structure - version 1:
The code consists of 3 major parts: MainWindow, Sowing and Communicate.
MainWindow
Here the main operations are done and the base of the interface is made.
This will provide a window with a drawable surface. The user can draw a pattern here and do some basic graphic manipulation on it.
Sowing
This function will convert the user inputted pattern to a data format that can then be sent to the Arduino board. It will then make contact with the board and send it the data one by one.
Communicate
All the basic communication instructions are specified here. This includes reading and sending a signal to and from the Arduino and a wait function, that waits for the device to be ready to open communication.
This file makes use of very basic serial communication code for the USB instructions, these instructions are found in serialport.cpp, which handles this for the Windows operating system, but can easily be replaced by code for other system architectures or operating systems.
Encountered problems:
By the creating of our robot we ran in to some practical problems with the Arduino board, namely with the USB communication.
During communication between the PC and Arduino the servo motors will make twitches which can be quite hard when information is sent on the serial port. For this reason the information from the PC will have to be sent while the switch on the Arduino board is switched off. This way the board will not make contact with the servo motors while the serial communication is done. This makes it impossible to send anything while the servo is connected with the board or to monitor the sowing progress.
An easy solution for this problem is the use of controllable electronic switch, namely a transistor or mosfet. Due to insufficient time though this was not implemented.
Because of problems with sending all the coordinates at once another solution had to be found.
The problem was that the program to decode the received string for the arduino became too complex and caused the Arduino to crash after sowing on one coordinate and start the program all over.
The third and final solution was to integrate all the Arduino code inside the GUI program code. The Arduino code is defined as one large string in the main code, the coordinated of the drawn pattern will be integrated into this string that is then written to a '.pde' file which can be uploaded to Arduino.
Code structure - version 2:
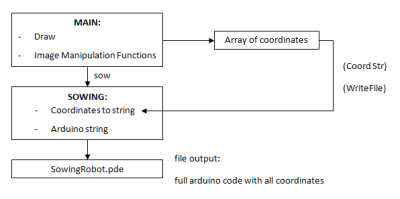
The code consists of 2 major parts: MainWindow and Sowing.
MainWindow stayed the same, Sowing will now convert the user inputted pattern to a data format that can then be sent to the Arduino board. The created file can then be uploaded to the Arduino board with the Arduino software.
GUI use:
Using the GUI to create and sow a pattern is really straightforward.
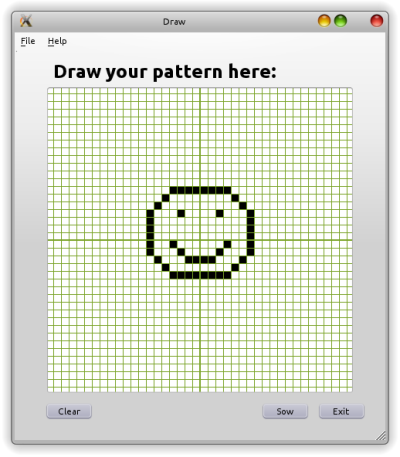
In the main window, you can draw your pattern by clicking on the drawing surface. This way one of the white rectangles will become black. By clicking on black pixels you can make them white. By pressing the clear button the pattern will be cleared.
Other operations can be done in the 'File' menu. One can draw a smiley with the 'Smiley' function. With the function 'Mirror' the upper, lower, left and right half of the drawing can be mirrored over to respectively the lower, upper, right and left half. 'Grid on/off' toggles the grid on and off and 'Invert' will invert the colors of the drawing.
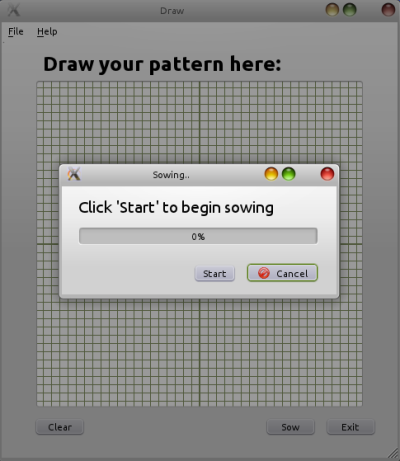
By pressing 'Sow', the user will see the 'Sowing' window where the user can make the robot sow his pattern and where the progress is seen.
The file containing all our programming can be downloaded here:
Right click to download programming file here