Mechatronics project
A new generation shopping experience!
Tell Me More

Presentation

    Specifications

    Hands-free

    Liberate the shopper's hands so that (s)he shops more. No disturbance in any way so the customer can let his automated trolley behind

    Follow the shopper

    Seamless interaction when the shopper moves. Finding the position of the target customer and move towards him

    Stay safe

    Avoid knocking the shopper by keeping a minimum distance. Avoiding collision and going around obstacles when possible


    General principle of the robot

  • The robot is an automatically driven supermarket trolley that is able to follow a target customer in a store. This technology would lead to comfort improvement since customers wouldn't need to carry a heavy bag, allowing them to walk freely. The robot is even more useful for disabled and old people with reduced physical abilities. The robot stays behind the customer at a short distance such that he/she is able to put articles in the trolley standing by. The automated trolley should then be able to detect the relative position of the target customer in order to follow him and maintain a safe distance. Also the robot should be able to detect any obstacle to avoid any kind of collision with an object, a human or another robot to insure safety. Finally if there is a quick possibility to go around an obstacle to reach the customer, the robot should be able to find the path to do so.
  • Features of the robot

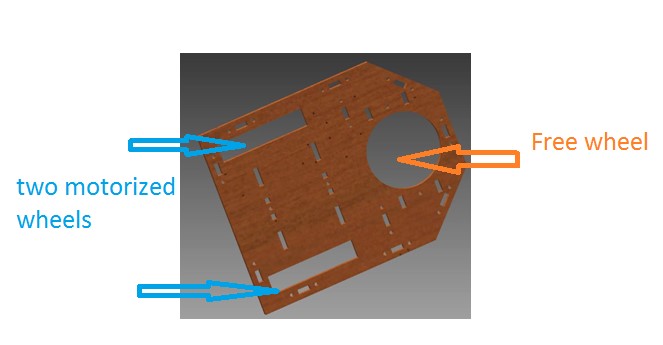
  • One free wheel in front (free in direction) and two motorized wheels on the back are used so that the robot is able to change its speed and direction (using the two motorized wheels).
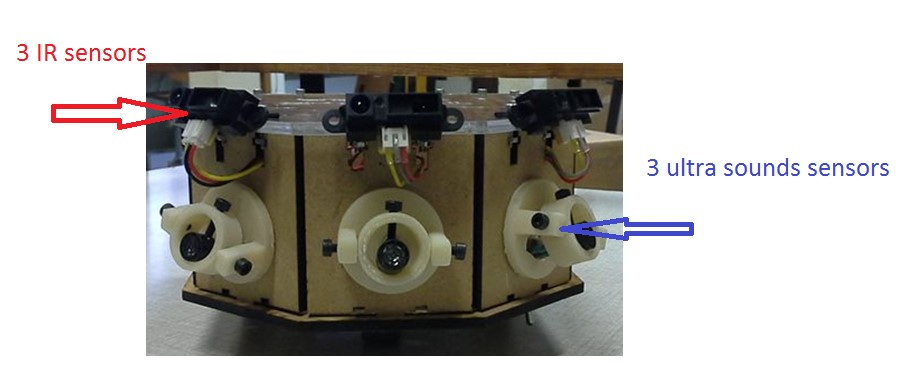
  • Three ultrasound sensors are used as customer detectors, so that the robot will be able to find his target customer which will carry a little ultrasound emitter. The three sensors will be oriented in different directions so that the difference of amplitude will be used to find the direction towards the target, while the average amplitude will be used to determine the distance.
  • Three Infrared detectors with different angle are used in order to detect obstacles. If the measured value of one of the IR sensors exceeds a threshold, an alternative path is provided or complete standstill is obliged.
  • Finally a micro controller will be the central link between sensors and actuators by making the best decision with the data of the sensors ( who are electronically pre-amplified).
  • Results

    Pictures and Youtube Videos

    Pictures

    Videos
Design

    How to build a TROLL-E?

  • After having chosen what kind of sensors that would be used, it was finally time to build the body of the Troll-E, which would determine how the robot would looks like.
  • The group went for a compact, simple and sturdy design which could resist a few shocks. After some conversations, the group decided unanimously that 3 sensors of each kind should be used: 3 infra-red sensors who would be used for the obstacle detection and 3 ultrasound sensors to detect the user. For a better precision when following the user in a straight line, we decided to put the 3 sensors in the front, with an inclination angle of 45 degrees. This is done in order to ensure as efficient as possible the scan area of each of the sensors. Nevertheless, this is valid if the scanning area of the ultrasound has a span wider than 90 degrees, which was first assumed (and which was not the case). Fortunately, the sensors were mounted such that some movement was allowed. A reduced scan area was created in front of the trolley so that following the shopper is still possible.
  • The number of sensors of each kind was set such that good movement quality was ensured while the total cost of the robot wouldn't be too high. This resulted in several constraints in the robot movement. On the one hand the robot is not allowed to move backwards since he has no idea of what is behind him. On the other hand, if the user would be behind the robot, this one would instantly scan the area in order to find the user if possible. That way, the robot rotates around a fixed point so that hitting obstacles while scanning is avoided as much as possible. This would result in a constraint on the design of the base platform: The dimensions of the robot in his ground plane have to be similar.
  • All those constraints resulted in a first basic sketch. The robot would in first instance look like a pizza-box like shape, considering the needed space for the PCB's

  •  
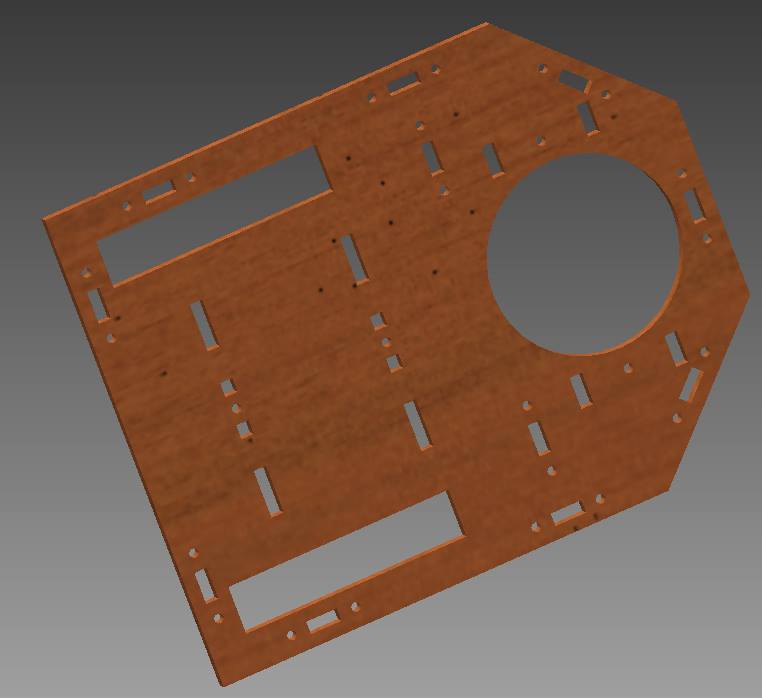
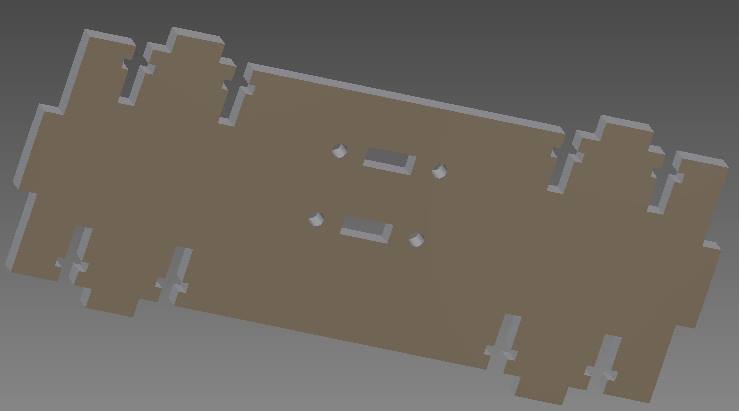
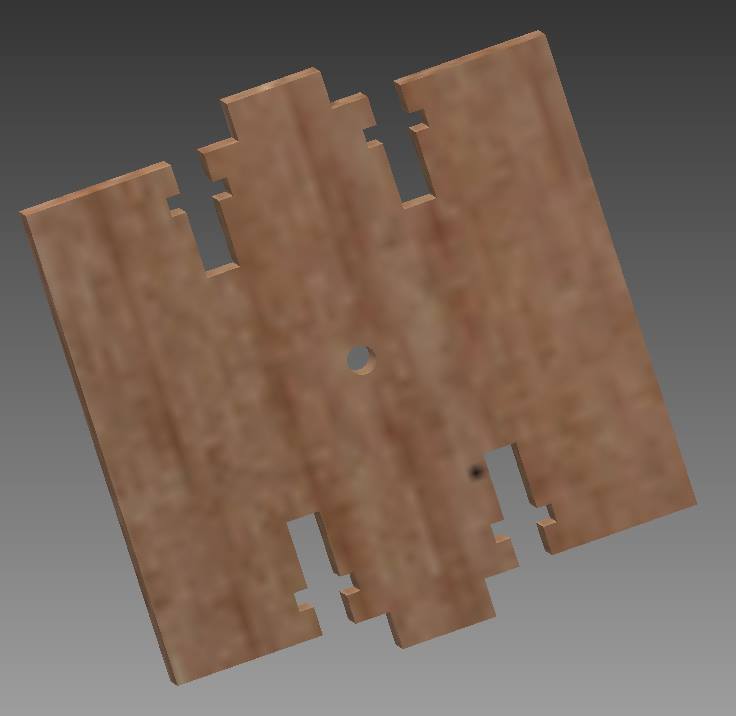
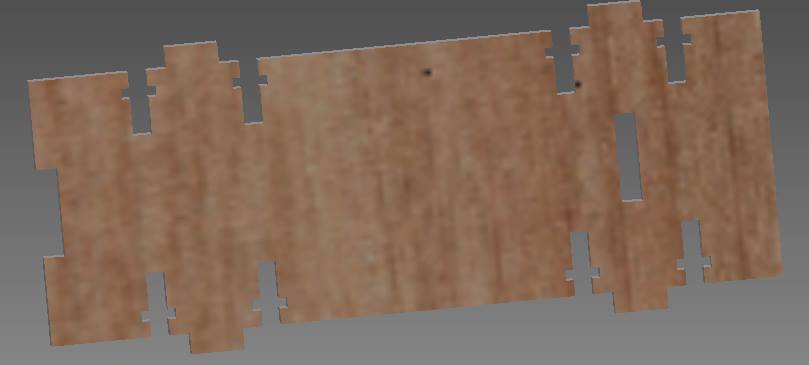
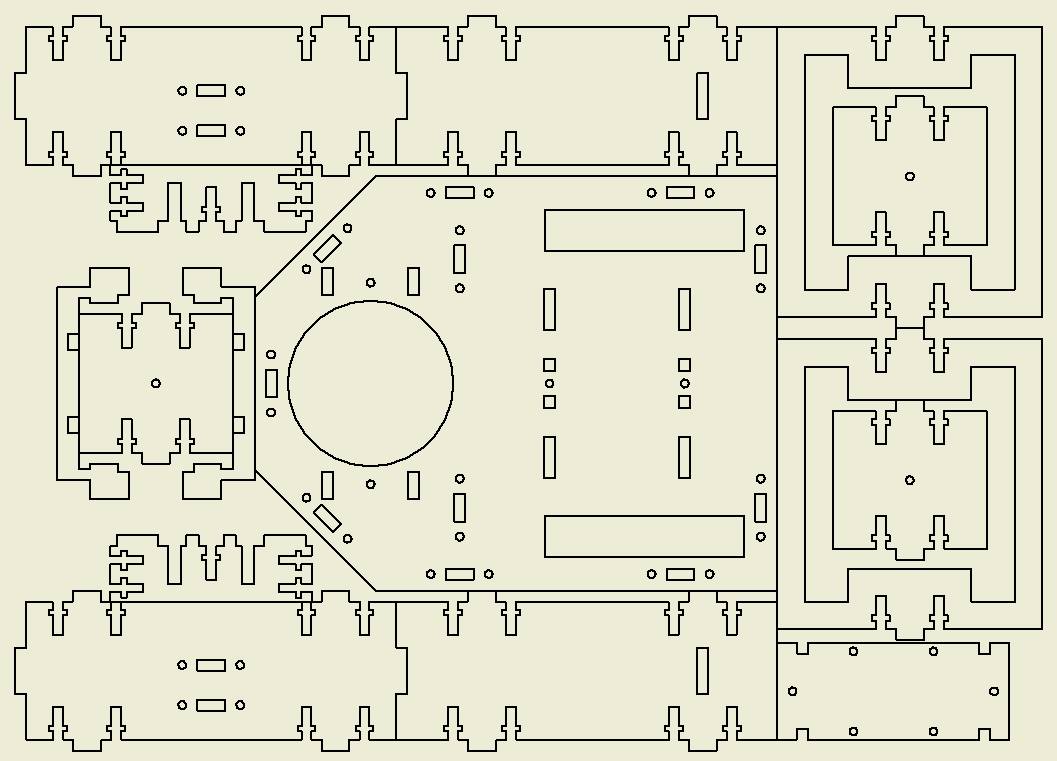
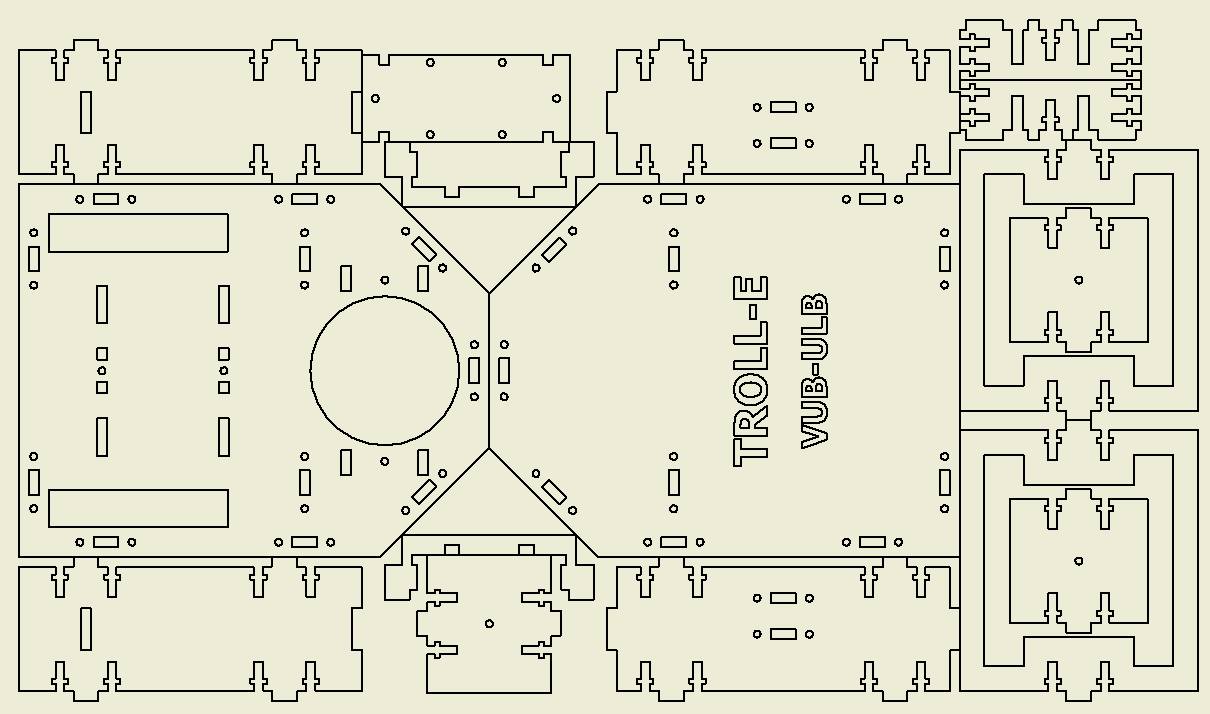
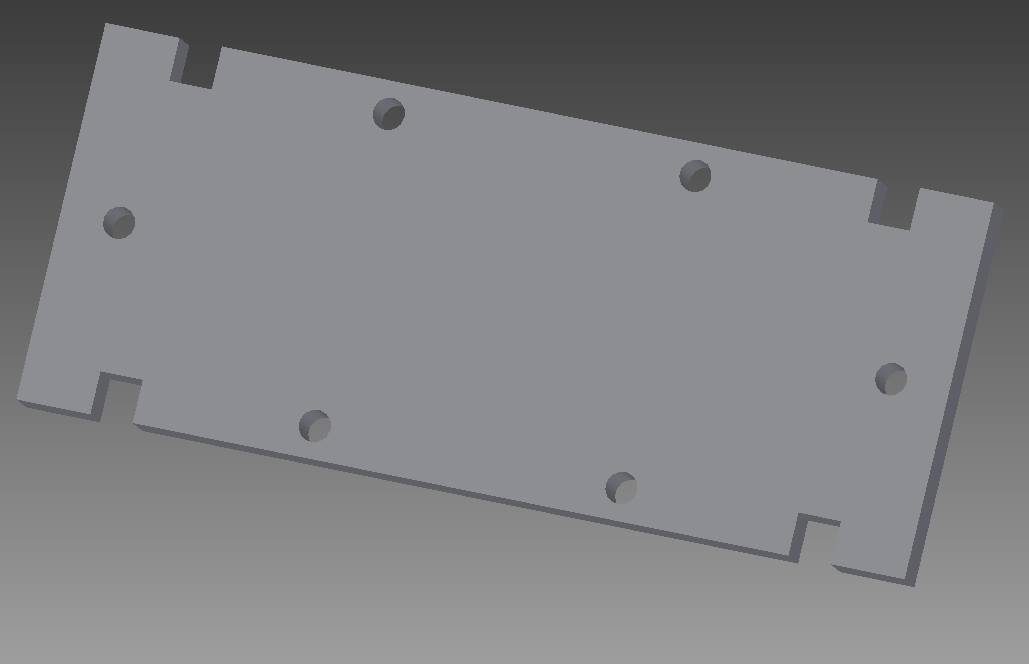
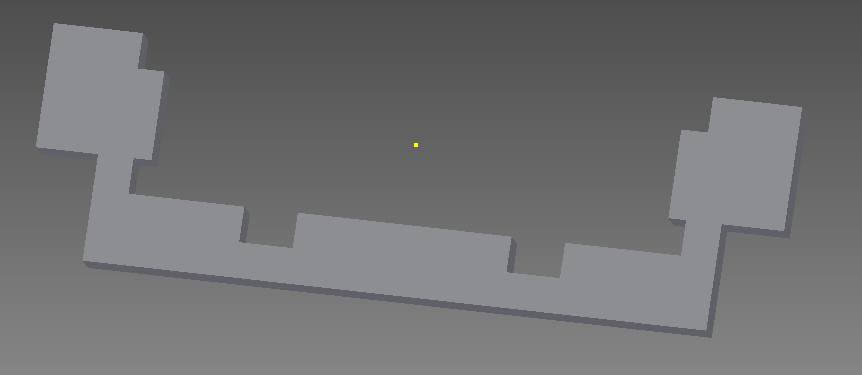
  • The next challenge that needed to be tackled was the way every part needed to be fixed. After several attempts, we managed this using simple fixations. Considering the fact that we would use lasercutting for shaping our parts, we cutted some rectangles out of the bottom and top plate so that every side panel would fit snuggly in the total design. The side panels who split the robot into several compartments do use the same concept to fix to each other. Screws and bolts are used to hold every part into place. Since lasercutting can only cut in a plane, we had to make screw fixations in the planes of each part. Doing so, we got different pieces who have their specific task to fulfill. Every wall needs to provide a fixation base and provides screw or nut mounts. Interior parts are:
    • Plates where PCB's are mounted on
    • Motor fixations built as such to ensure compactness
    • Caster wheel parts built so the robot is horizontal

     
  • The position of every part is such that every needed piece fits, and that a certain margin is kept to ensure the robustness of design. Holes aren't placed too close to each other since stress would need to pass through a reduced sectional area, which could lead to the failure of certain parts (e.g.: the fixation of the motors)
  • The main compartment

  • In the main compartment, storage of battery supply, wheel space, motors and PCB's constrained the final design as following. The motors we used were already available and didn't need too much current to ensure a long use of the robot. Those were in fact servomotors of Futaba. After tweaking those motors (decoupling the potentiometer and fixing him in central position, and removing the 360 degree blocking pin) which would go to a fixed position depending on the voltage on their sense line, these became motors who would rotate forwards or backwards with a controllable speed. The maximal rotation speed was given at 1.2 rotations/second, which would fix the needed radius of the wheels in order to be able to follow the user at rated speed.
  • The batteries and the motors were chosen to be on the same level, which fixed the complete layout on the bottom plate. At that moment, dimensions of the sensor PCB (who pre-processes the signals of the ultra-sound sensors) were known giving the required height of the robot. These constraints fixed the majority of the design of the robot.
  • The caster wheel compartment

  • In this compartment, the caster wheel is stored and a battery was placed in order to feed the Arduino which would be used to process the data acquired by the sensors and actuate the servomotors. Due to a non-negligible current that is drawn, the battery was soon wasted, so that another solution had to be provided. At that moment, the group decided to use an external battery who was powerful enough to feed the whole 5V load (the Arduino and the two servomotors). This is why we made a whole in the side of the robot in order to fit a USB-cable from the external battery (mounted on top of the robot) to the direct input of the Arduino.
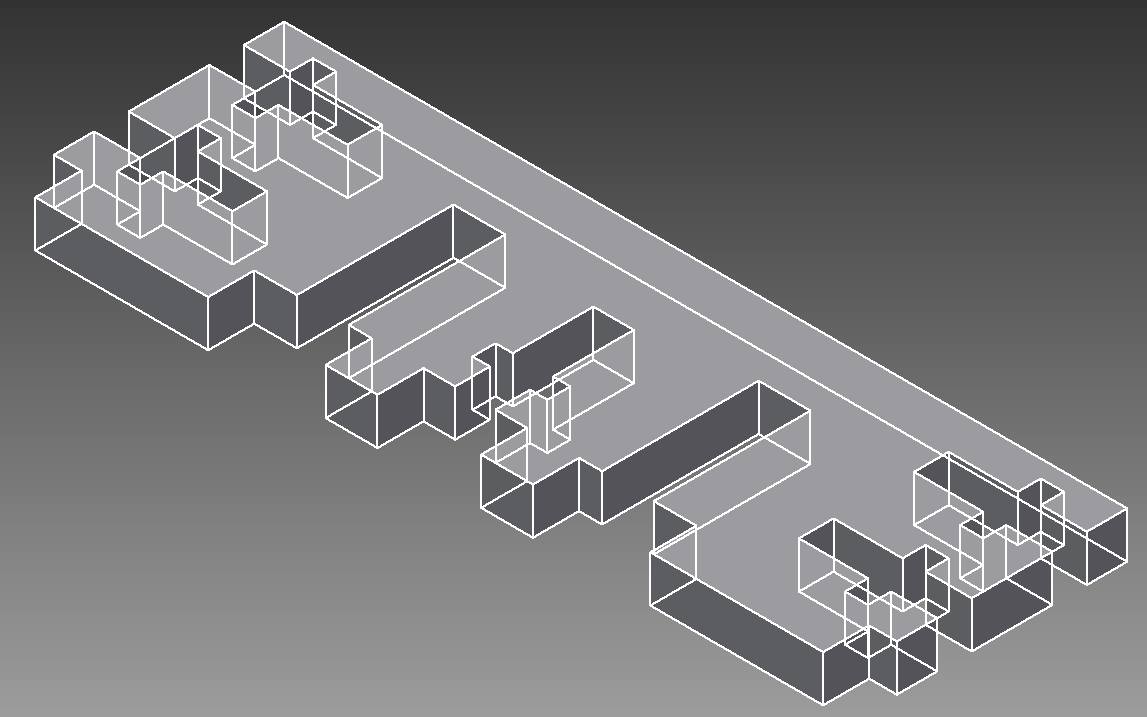
  • A caster wheel was chosen at Brico out of a range of possible dimensions, such that the use of MDF (medium density fiberboard) was minimal. A too small wheel would mean that fixations of the caster wheel would have to be outside, which is not aesthetic. A too large wheel would mean more MDF than needed using a smaller wheel. A clever design was used so that only two screws were needed while using plane parts. This designing part was done experimentally after several attempts. Simplicity takes the winning hand and was the focus of the whole design.
  • The body, final design

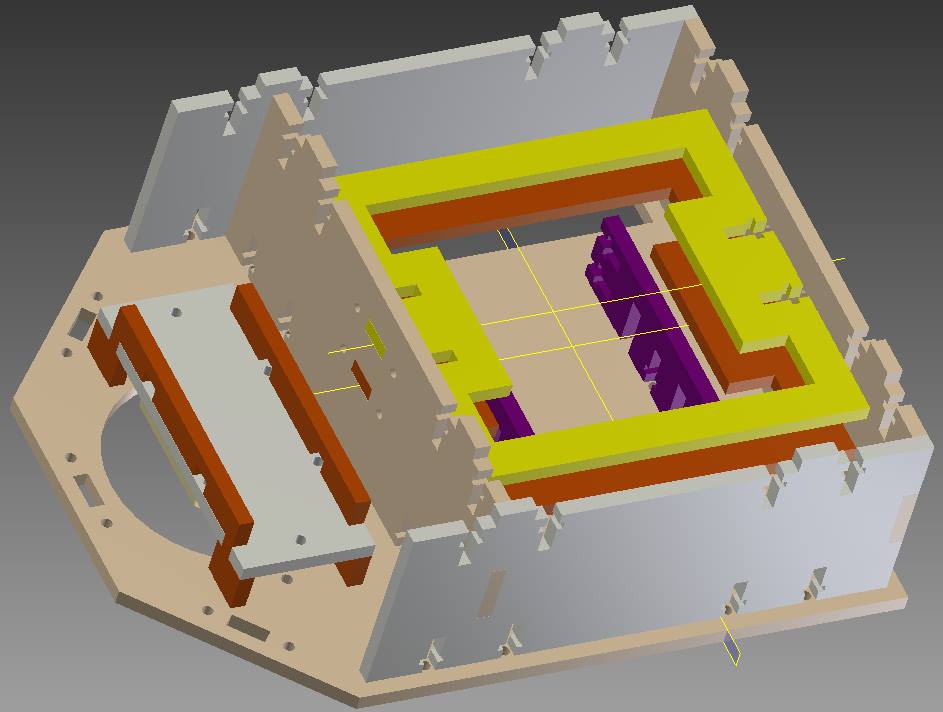
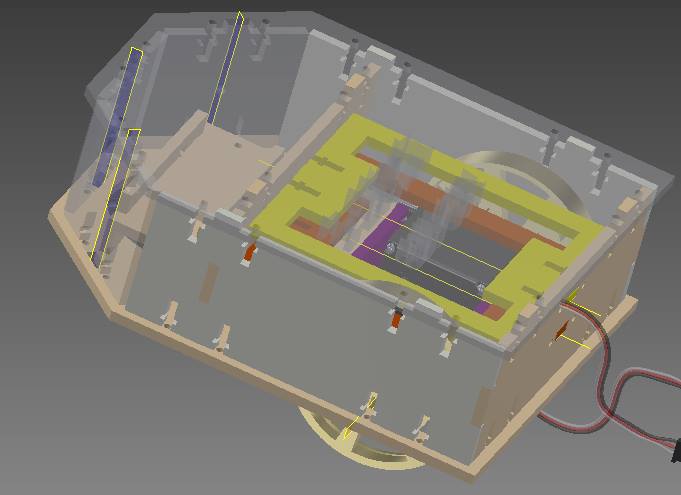
  • After considering all those constraints, the team managed to provide the following final design.
  • The pink part is the fixation used for the two servomotors who will lay flat under the orange plate which is used to fix the sensor PCB.In the following picture, the three side panels necessary to fix the sensors are not shown in order to have a better view at the caster wheel fixation.

  •  

    Mounting the sensors

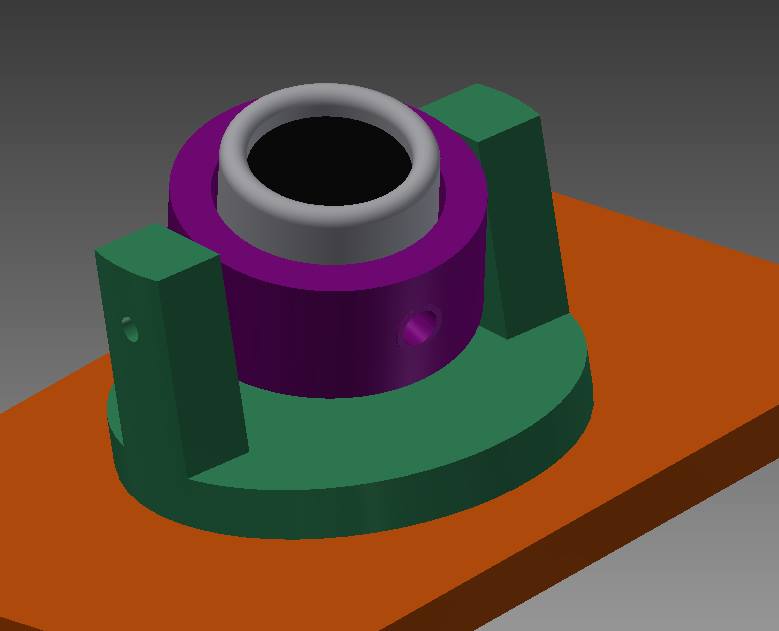
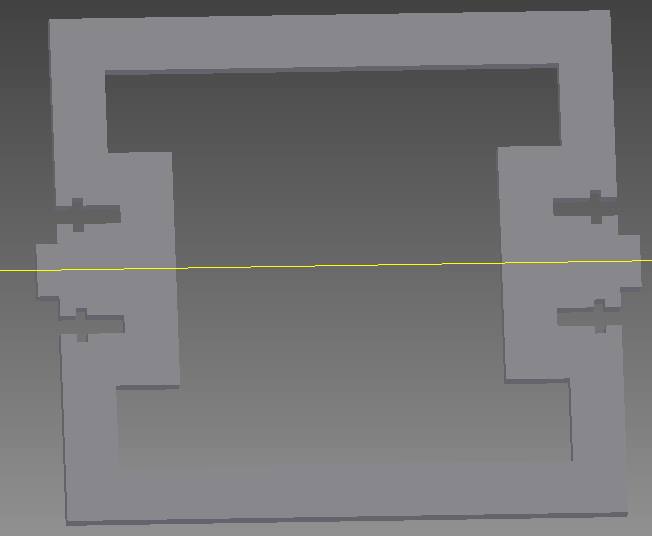
  • As already mentioned, the ultrasound sensors are mounted in the front side by side. To allow some movement, a simple 2DOF structure has been designed and 3D-printed. The dimensions follow directly from the given dimensions of the chosen ultrasound sensors. A picture might make this clearer:

  •  
  • Screws are used to firmly fix the ultrasound sensor. The orange plate represents the side panels where the green fixation free rotates on.
  • The wheels

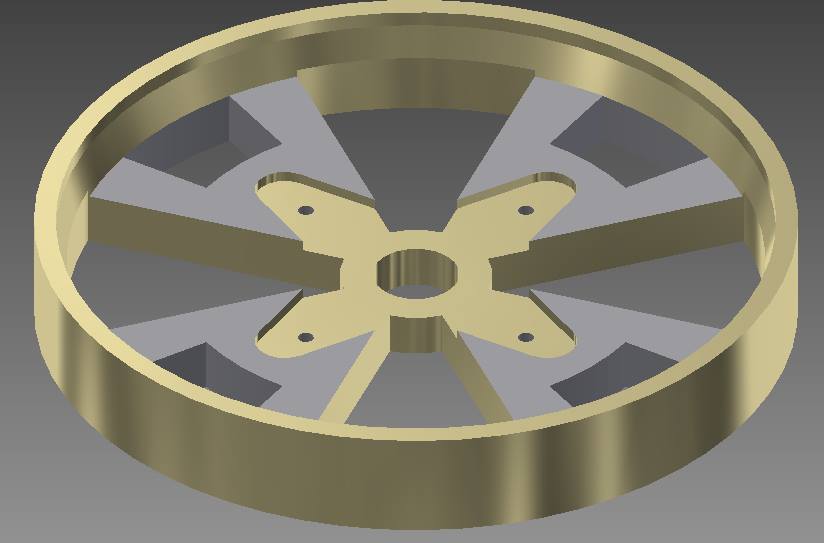
  • The robot has a pair of wheels in order to move. These were chosen to be 3D-printed, which would bring constraints with it. Knowing the needed radius and the fixation possibility to the servomotors was not enough to design them. Since we would use 3D printing, it would be suitable to have a flat face on the wheel. Finally, the used material should be reduced in order to not waste some of it. This is done by making a thinner wheel and by removing considerable amounts of its section. Further constraints are set by the connection tool that was already provided with the servo motors. This gave rise to the following design:

  •  
  • On can clearly see the reduced thickness while making sure to have a sturdy design. Also, the fixation to the servo motor is clearly seen. In order to balance the wheels as good as possible, we put them on a lathe (draaibank) at low rotational speed. Changing recursively the position of the fixation w.r.t. the wheel, the wheels where more or less balanced.
  • More (general or detailed) pictures of the design can be found by clicking the pictures below.

Global

Overview

Sub parts

Wheel and ultrasound sensor

Plate and Fixations

Technical details

All the mechanical design is downloadable here:

Electronics

Sensor Introduction

  • In order to ensure the correct working of the robot, several sensors have to be used. Three ultrasound sensors will be set on the robot with different angle to determine the position of the customer that the robot should track and follow. There will be one central ultrasound sensor and two sideways sensors oriented at (less than) 45° left and right so the robot is able to determine if the customer target is changing direction and how far he is. To be able to use that measurement, an analogical treatment of the signal is performed so it makes sure that the Arduino microcontroller can treat that information properly.
  • Secondly, three Infra-red sensors will be used as obstacle detectors because the robot should avoid any collision with people or objects at all and ensure safety when working. The purpose of using three sensors with different angles is to be able to know where the obstacle is and eventually go around it if possible. Again a sensitivity analysis will be performed to know if an electronic treatment of the signal is necessary.

  •  

    Sensitivity analysis of ultrasounds sensors

  • First, to determine the sensitivity of the receivers, an ultrasound is generated by the transmitter connected to a 40 kHz oscillating voltage 0V to +9V. The Datasheet of the transmitter (MA40 A5-S) is provided:

  •  
  • Then measurements are executed on the receiver with an oscilloscope. The phase is not important since it won't be used, we only care about the amplitude. The following response m was obtained:

  •  
  • As it is obvious on the graph above, ultrasounds intensity is not only influenced by the distance between emitter and receiver, but also by the relative angle.
  • For the measurements, the transmitter had a fixed orientation and the receiver was oriented toward the transmitter, the relative angle is then easily calculated using its position. The maximum amplitude appears to be 5mV which is low and due to the fact that those are passive sensors (not empowered by external source), amplifying the voltage is required.
  • Since the Arduino micro-controller has an input range of 0V to 5V, and since the maximum amplitude of the signal is about 5mV, it will be necessary to amplify the signal. Then it will also be necessary to filter the signal (high pass) to insure that no audible sounds will parasite and disturb the measurements. Finally, a rectifier circuit will convert the 40 kHz signal into a DC signal of proportional amplitude.

  •  

    Receiver electronics

  • To treat the sensors signal, several components will be needed such as:
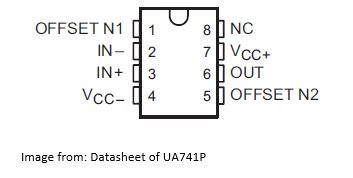
  • an Operational Amplifier: UA741P

  •  
  • Diodes: 1N4001

  •  
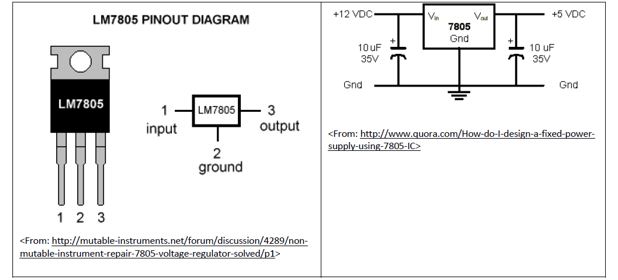
  • Voltage regulator(s): 7905 (-5V) and 7805 (+5V)

  •  
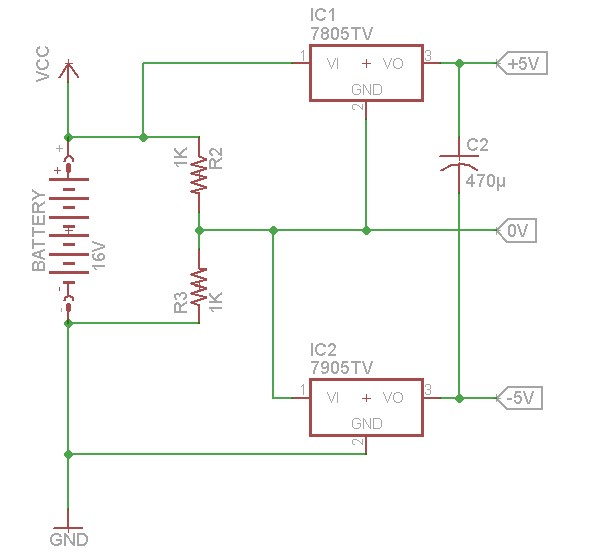
  • First a circuit has to treat the input voltage supply and generates 3 stable voltage source: -5V, GND, +5V because the treatment circuit will be based on an operational amplifier that needs to be fed by symmetric voltage sources.

  •  
  • This circuit will generate the 3 stable output voltages only if the input voltage (battery) is higher or equal than 16V. Because, indeed, it is necessary to provide more than 5V to the 7805 if we expect 5V at the output. The middle point (between R2 and R3) will be defined as GND. The capacitor C2 insures the stability of those voltages (killing the source noise).

  •  
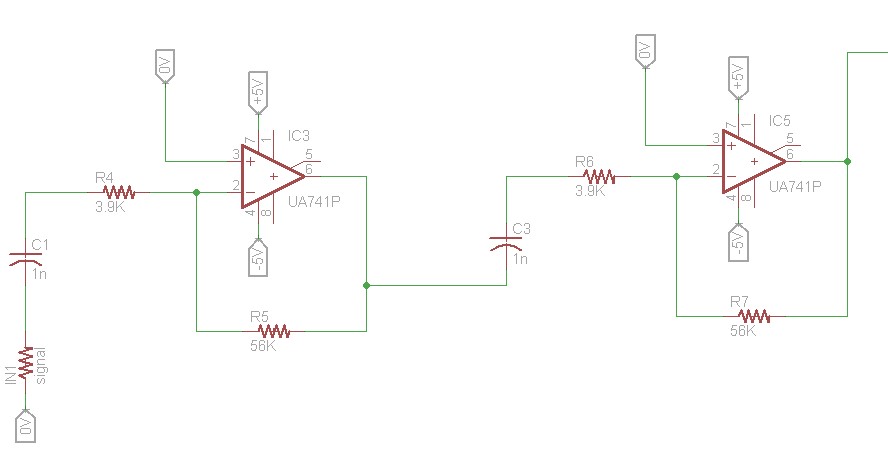
  • The two first stages are completely similar, simply two amplifiers stage. The reason for using two is that it avoids a too important amplification at one stage and this is necessary to prevent trouble due to BIAS current that will generate a parasite voltage that will also be amplified.
  • It is quite easy to determine that the final amplification factor is:
  • (56 kΩ/3.9k Ω)^2= 206.18
  • Each stage has an individual amplification factor of 14.35. Furthermore, we also use those two stages to filter audible noise with two successive first order high pass filters. Let's set a cut-off frequency of 40 000 Hz with a capacitor of 1nF.
  • Then because of the total impedance formula (Z = 1/jwC + R). We obtain that 1/(2*Π*40000*(10)^(-9) ) = 3979 Ω
  • The resistor value is then set at 3.9 k Ω.
  • Now that the amplification and filtering of the signal is done, let's design the rectifier:

  •  
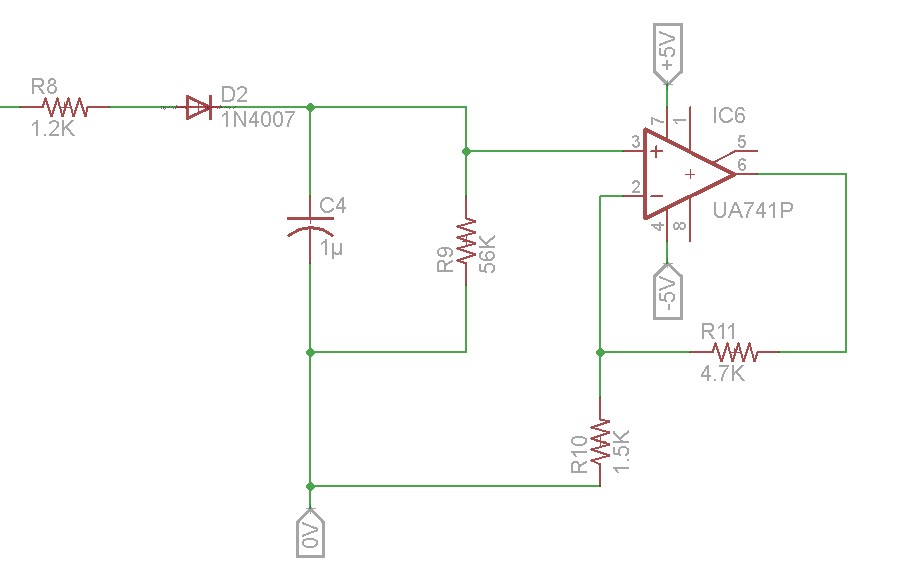
  • When the instantaneous value of the alternating tension is above 0.7V, a current will flow through the diode and charge a capacitor C4. When the tension is below 0.7V, the capacitor will discharge through the resistor R9.
  • Since the expected input frequency is 40 kHz, the period τ between two peaks is 2.5*10^(-5)s. The discharge time should not be too little to avoid fluctuation of signal. R*C = 56000*10^(-6) = 0.056s. The ratio of the discharge time on the period is: 0.056/2.5*10^(-5) = 2240 which is enough to avoid fluctuation. Furthermore, 0.056 seconds is sufficiently low since the signal is related to mechanical position.
  • The charging time is obviously quicker: R *C = 1200 * 10^(-6) = 0.0012 s which is needed to reduce the static error (because the tension never reaches the input peak value).
  • Finally a last amplification stage is operating on that DC tension in order to get 5V output for the maximum alternating input. The last amplification value is 4.7k Ω/1.5k Ω = 3.13.
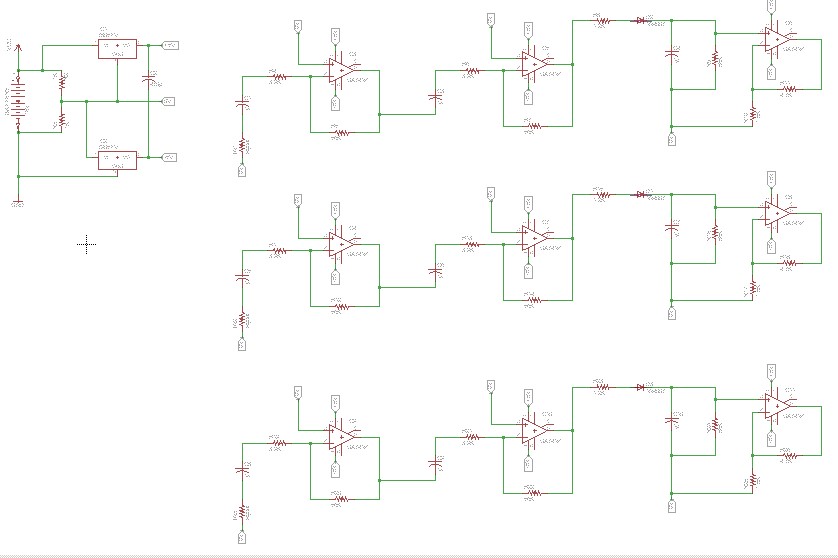
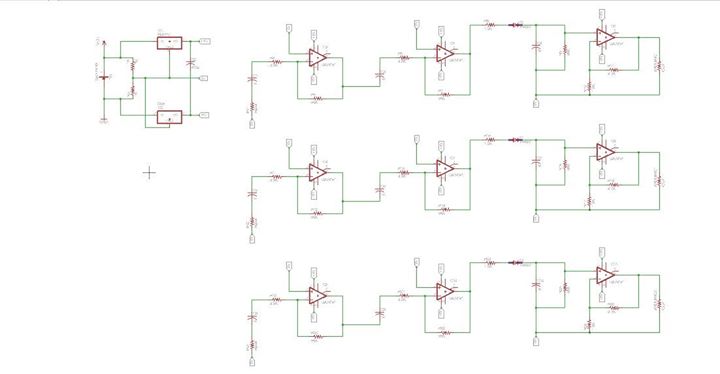
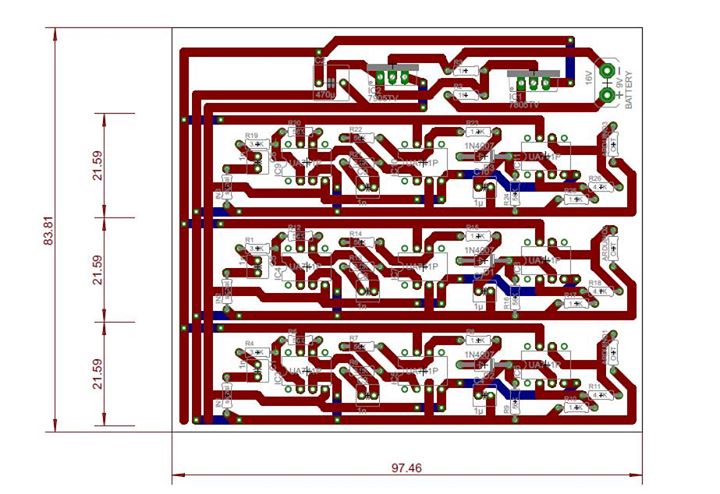
  • That circuit has to be repeated three times on the same PCB because the 3 sensors signals have to be treated separately, resulting in the following schematic:

  •  

    Transmitter electronics

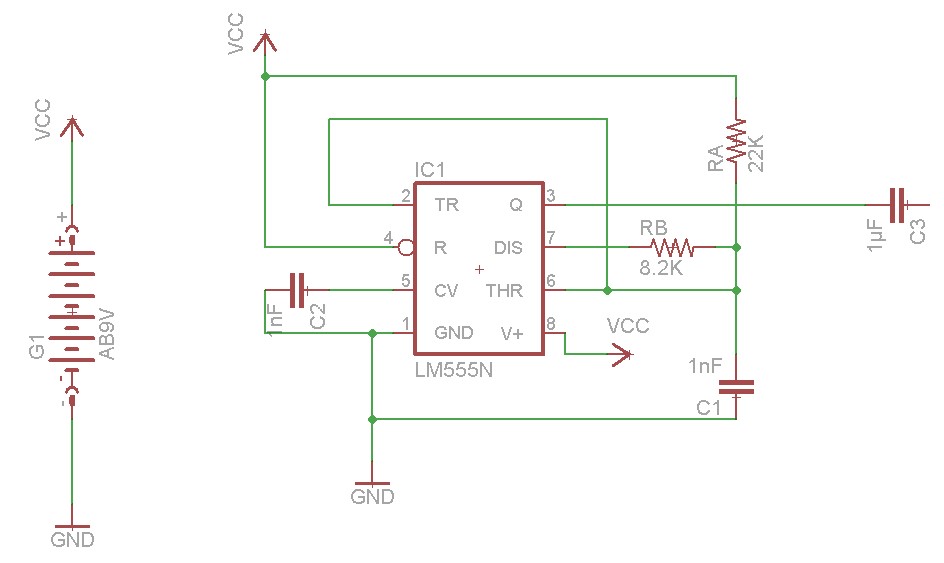
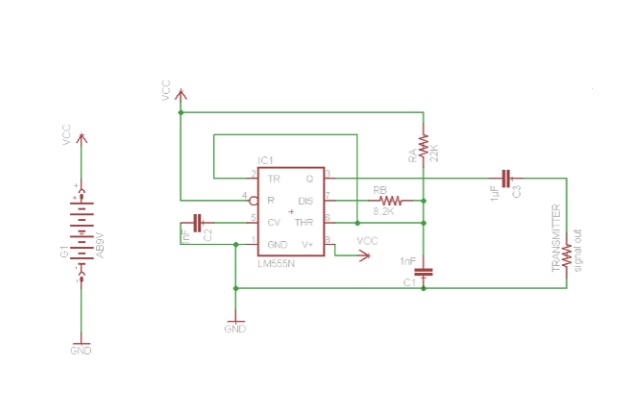
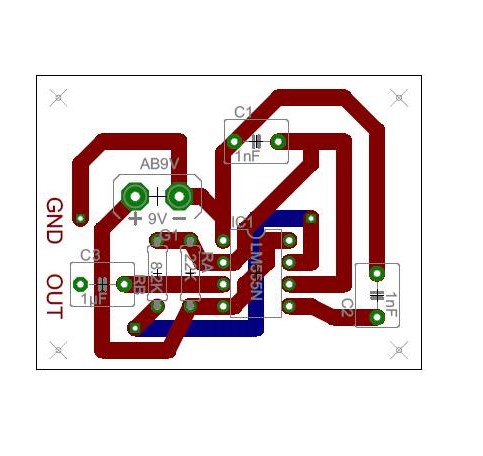
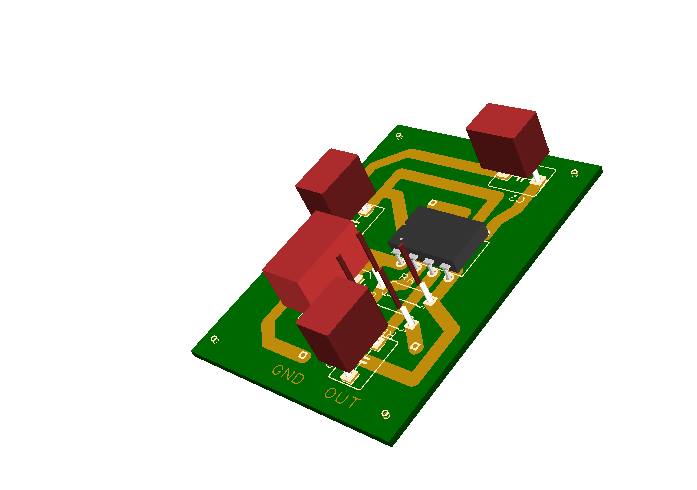
  • The signal generator of the signal will be held by the customer. The circuit is fed by a 9V battery. The oscillator is based on a catalogue circuit proposed in the timer 555 datasheet.

  •  
  • Since the frequency of 40 kHz is known, t1 = t2 = 1.25 * 10^(-5) s. The capacitor is arbitrary chosen with a value of 1nF. Ra is then equal to: t1/(0.693*C) = 18 037 Ω. The solution of the second equation here above gives Rb = 8.2 kΩ. With those values the following circuit is constructed:

  •  
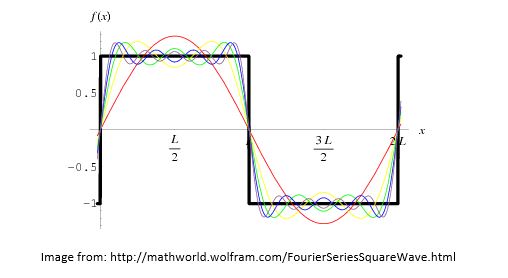
  • The output of this circuit is simply connected to the transmitter. It is obvious that the signal here is a square wave and not a pure sinus. But since a square wave can be decomposed into a fundamental sine with frequency of the square wave itself and some higher harmonics, there is no need to filter the signal to cut higher frequencies.

  •  

    Schematics

    Design

    Layout

    Design

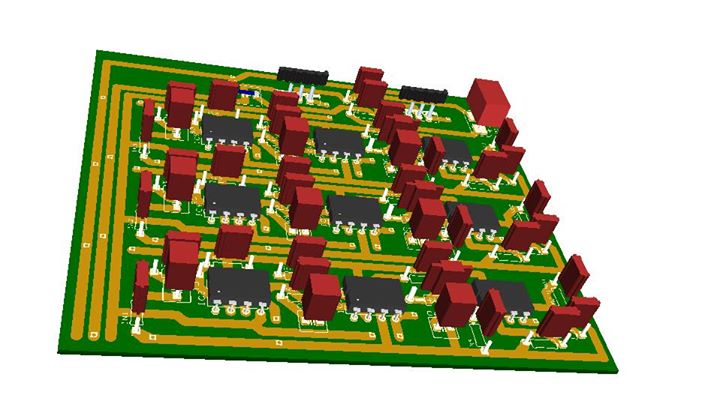
    3D Views

    Design

    After treatment ultrasounds sensitivity

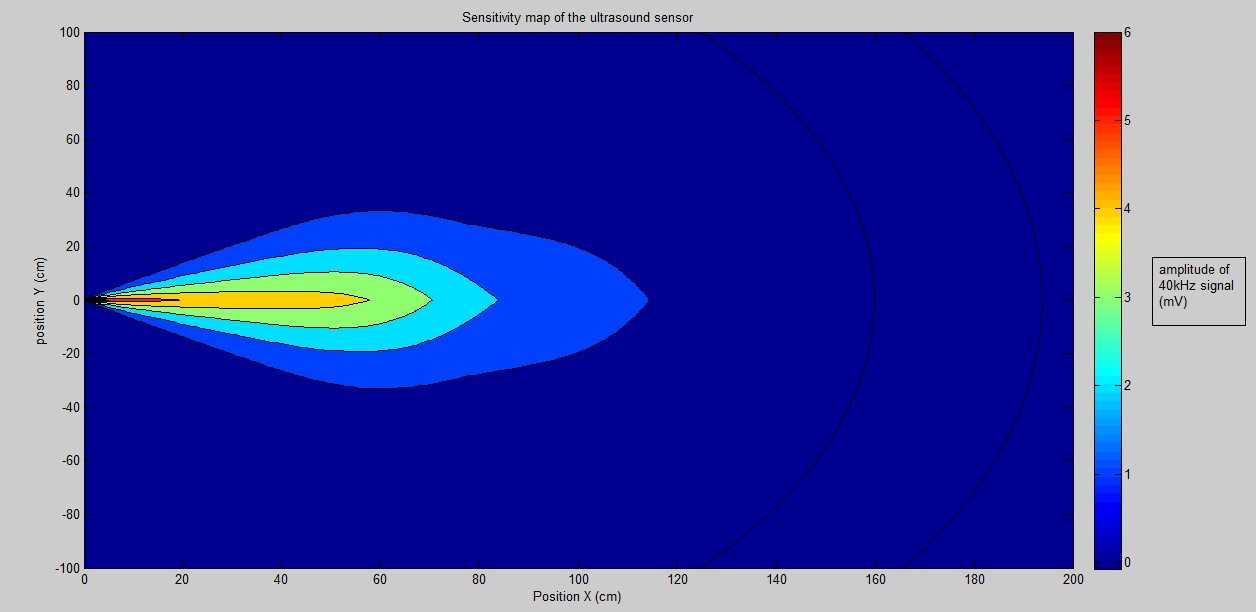
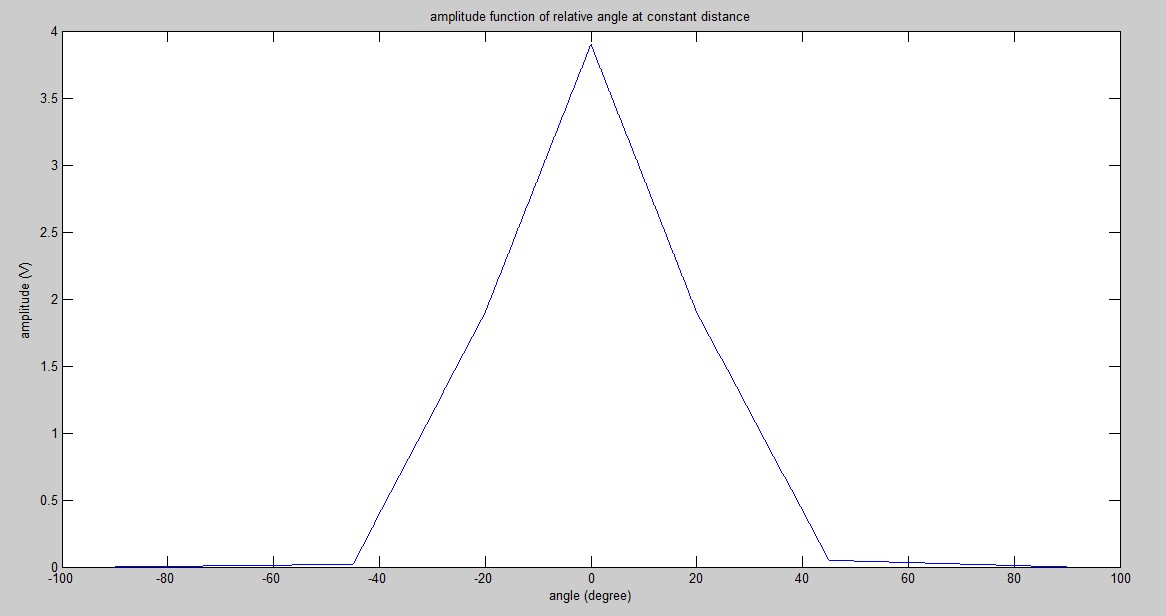
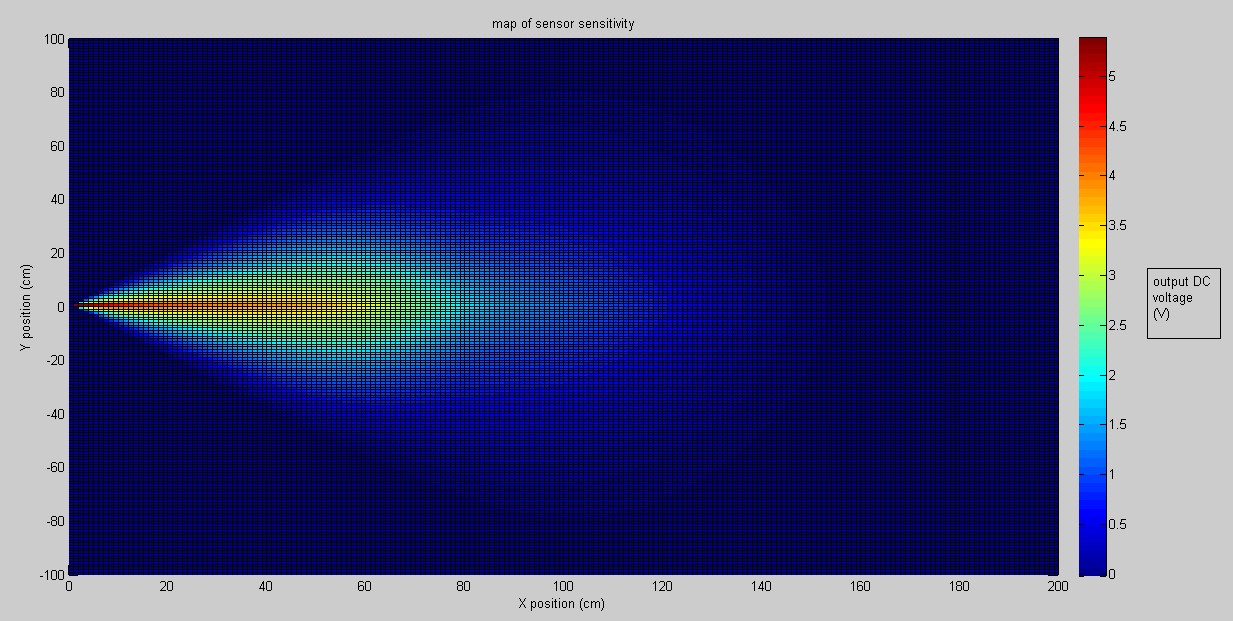
  • Since both transmitter and receiver circuits are constructed and operational, a final sensitivity test is performed in order to know in what range of distance and angle the robot will be able to get the position information.
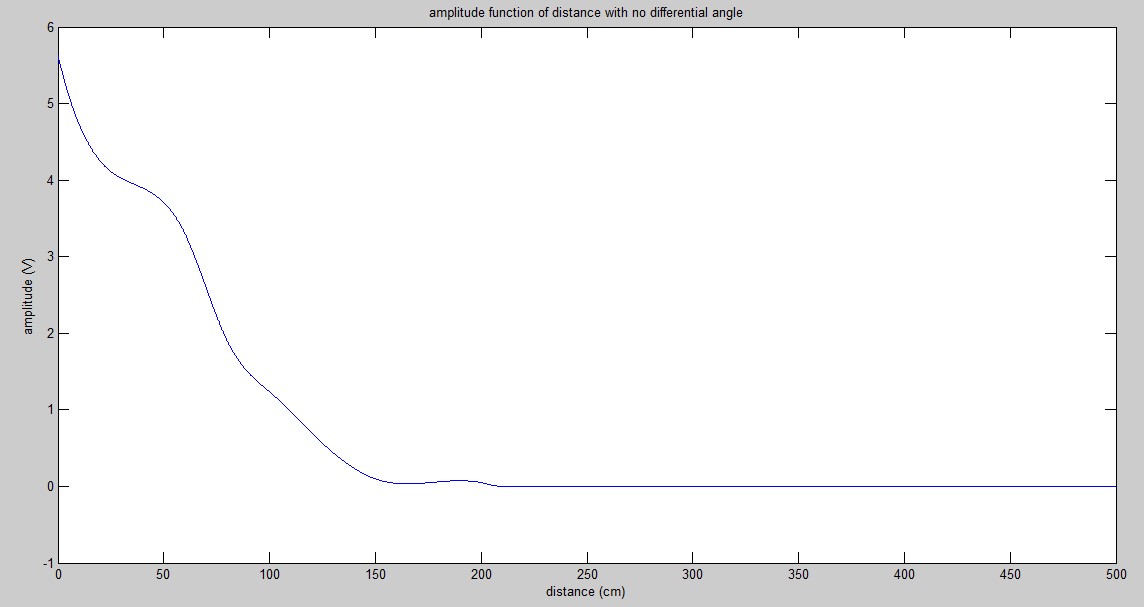
  • First, at constant distance from the transmitter, a variation of the relative angle is applied while measuring the amplitude of the DC signal. Next, both transmitter and receiver are set "face to face" which means no relative angle, and the distance variation is tested. The results of these experiments can be found in the following box.
  • Ultrasound measurements


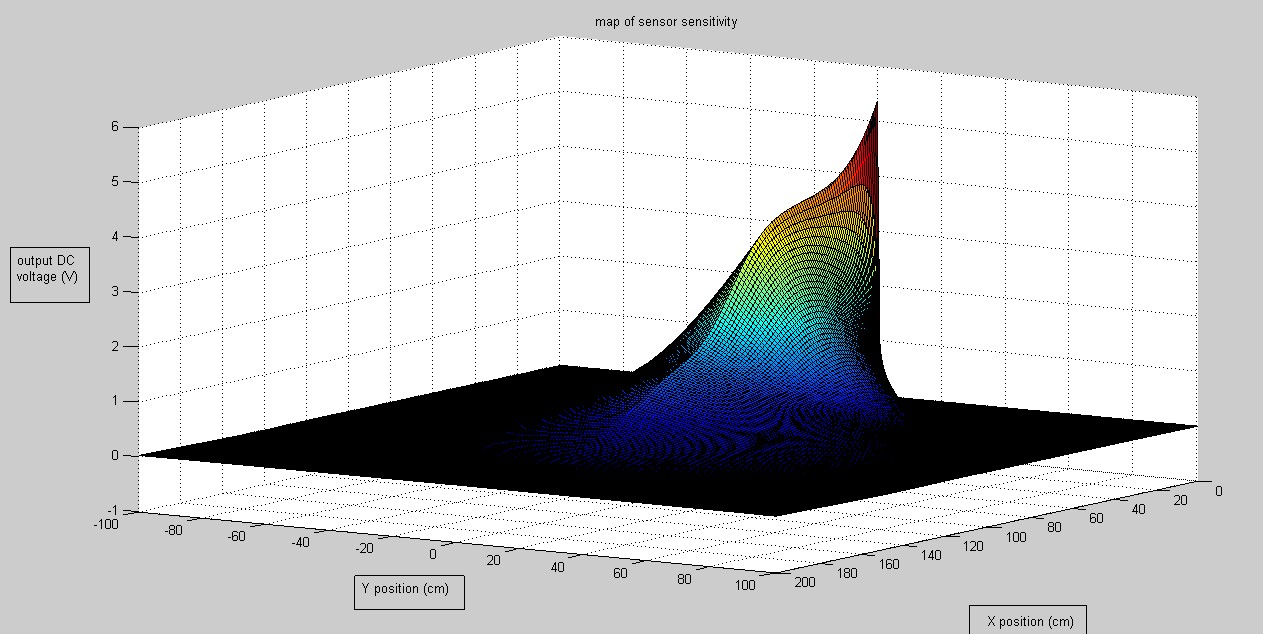
  • With those two measurements and under the assumption that the influence of distance and angle are independent, a sensitivity map can be generated:
  • Ultrasound Maps

    Sensitivity analysis of Infra-Red sensors

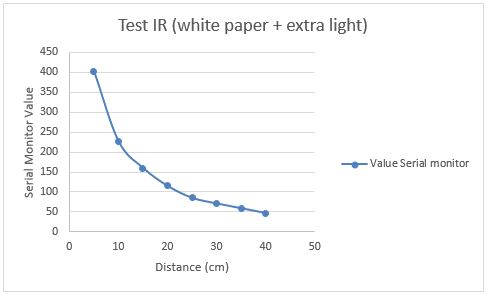
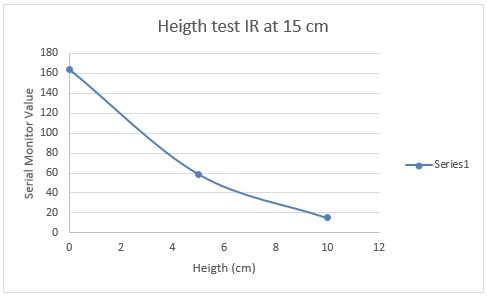
  • Since those sensors are "active", they are fed by a 5V voltage source and provide measurement from 0V to 5V in function of the distance. There is no need to treat the signals which can be directly connected to the Arduino microcontroller. Since the Arduino converts a range from 0 to 5V into an equivalent number of bits from 0 to 1024, measurements can be operated directly on the micro controller via the "Serial monitor function".
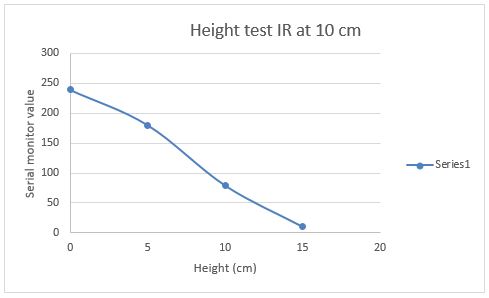
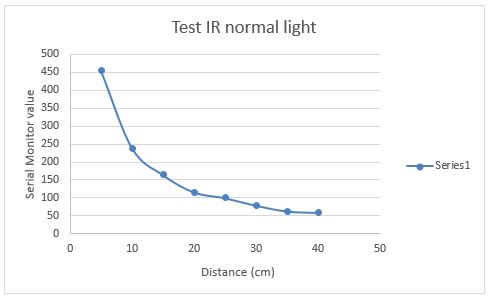
  • In the following box, graphs of the IR sensors can be found. The tests were performed in different conditions. Test were performed with different color obstacles, extra light, normal light and different inclinations of the sensor.
  • IR sensor experiments


  • The conclusion of those measurements is that the robot will be able to detect an obstacle at 30 cm of distance in a reliable way which is enough for him to stop since his maximum speed will be limited and controlled. Also the amount of external light present has not a significant influence on the measurement which is good in our case because it means that it has not to be taken in to account.
  • Power system - Feeding the different components

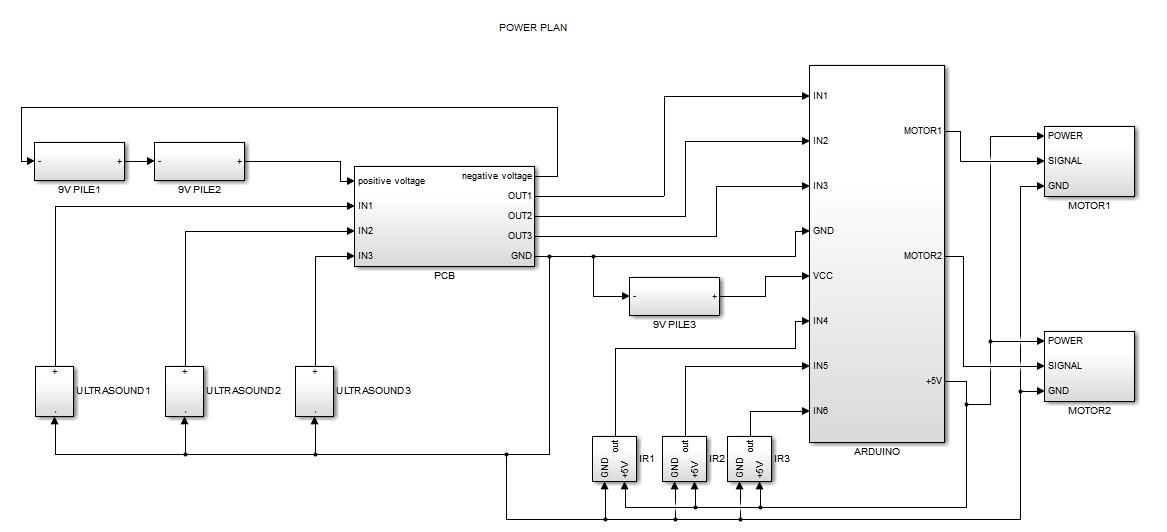
  • First, two batteries of 9V in series will feed the ultrasound PCB signal treatment. This PCB will provide a GND contact to the three ultrasound sensors, and will get their signals. Then the GND of the PCB is connected to the Arduino microcontroller GND, from this GND a +9V battery will feed the Arduino.
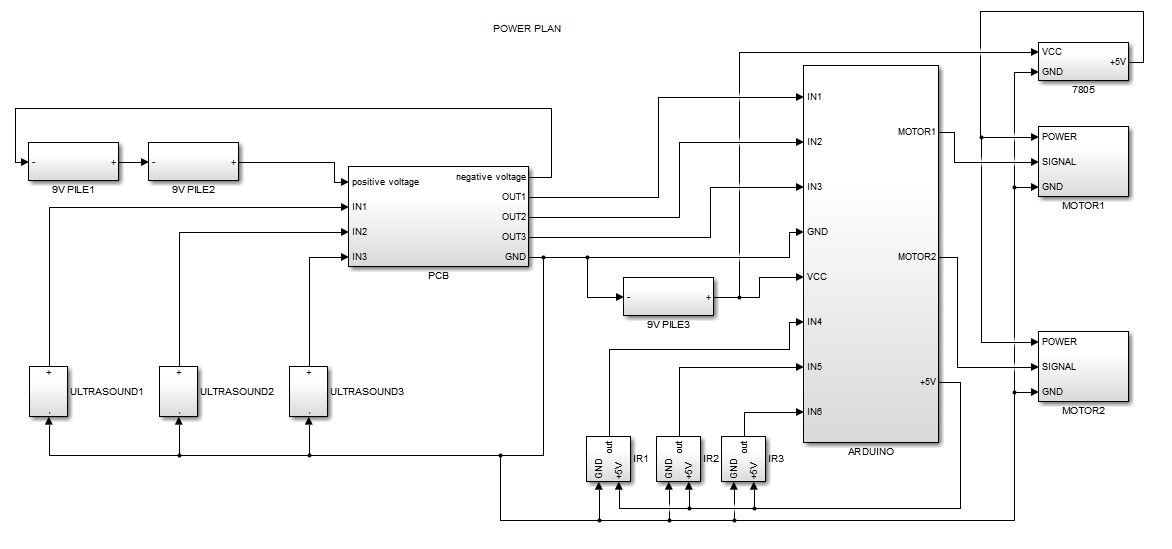
  • The +5 V output of the Arduino will feed the 3 IR sensors since those are active and need +5V to work properly. The output IR signals are directly sent to the Arduino. Finally the command of the motor is sent from the Arduino to both motors. On the schematic above a big mistake was made since the power that feeds the batteries is going through the Arduino which is not allowed to draw a high current (about 2A max). So, another power design was made to avoid that problem:
  • This design uses a 7805 to feed both motors power input from the 9V battery which solves the problem.

The code

  • A little reminder before explaining the code. The trolley is controlled by an Arduino microcontroller. This Arduino is connected to 3 ultrasonic sensors, 3 infrared sensors, 2 motors for the wheels and 6 LEDs.
  • Before explaining the code, it would be good to tell a few other things first.
  • There is a library in Arduino that allows to control servomotors easily by creating an object "motor" in the code and using prefabricated functions to set the speed or the position of these. In this library, the instruction for setting a speed or a position is motorA.write(X) where motorA is the name given to the motor during the set up of the program and X is a value between 0 and 180. If the servomotor still has its 360 degree block pin, this instruction will set the position of the servomotor. Else, a value lower than 90 should make it turns in one direction and a value higher than 90 should make it turn the other way. 90 is a neutral point that makes the motor stand still. One of the problems encountered during the project is that this neutral point was not precisely 90 and kept changing depending on the level of the batteries. Therefore, stopping completely the motors was harder than expected (since no encoders where used in order to provide a kind of feedback).
  • There is not much noise on the IR sensor measurements. They work just fine and give a precise value. Unfortunately, the same cannot be said about the ultrasonic sensors. There is a noise varying from 0 to 400 while a normal reading when the sensor detects the emitter is about 800. This noise has to be taken in account in the code. It can be noted that the noise was varying periodically and at a given time all three sensor gave the same value for the noise. There was apparently a periodic source of ultrasound somewhere in the testing area.
  • First program (design conditions)

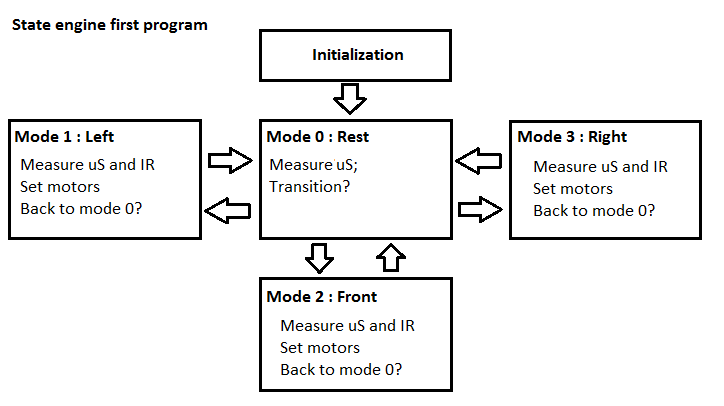
  • The first program was made when the trolley wasn't assembled yet. It was supposed to work in case all sensors are functioning as they did during the tests done previously. This code is labelled "FullProgram-V4". The principle of the program is shown on the following figure.

  •  
  • During the initialization, every pin used is declared as input or output.
  • During mode 0, the trolley is at rest and takes the values of the ultrasounds sensors. It then looks where the maximum value is. If this maximum value is inferior to the noise, the trolley stays in mode 0. If the maximum is higher than the noise, the trolley will switch of mode depending on where the maximum is located. (Mode 1 on the left, mode 2 in front, mode 3 on the right)
  • During mode 1, 2 or 3, the principle stays the same. First the measurements of the IR sensors and the ultrasounds sensors are taken, and then depending on those measurements the speeds of the two motors are set. And finally, if the maximum value of the ultrasonic sensor changes position or drop below the noise, the mode is set back to mode 0.
  • The LEDs are also lit and shut down to inform the user of what the trolley is doing.
  • The advantage of this program is that it includes every possible situation and the response of the trolley (speeds of the motors) can be changed individually for every single one of them. The parameters such as the noise limit and the pins of the Arduino can also be changed easily.
  • The disadvantage is that this program was not successfully tested because it designed in case all sensors are functioning well. Another disadvantage is that the speeds of the motors may not be accurate, so maybe the trolley might not stay totally still when it is supposed to.
  • The problem that was encountered is that the ultrasonic sensor in the front somehow gives a much smaller readings than the other two ultrasonic sensors once the trolley was assembled. Another program was implemented due to this problem.
  • Second program (real conditions)

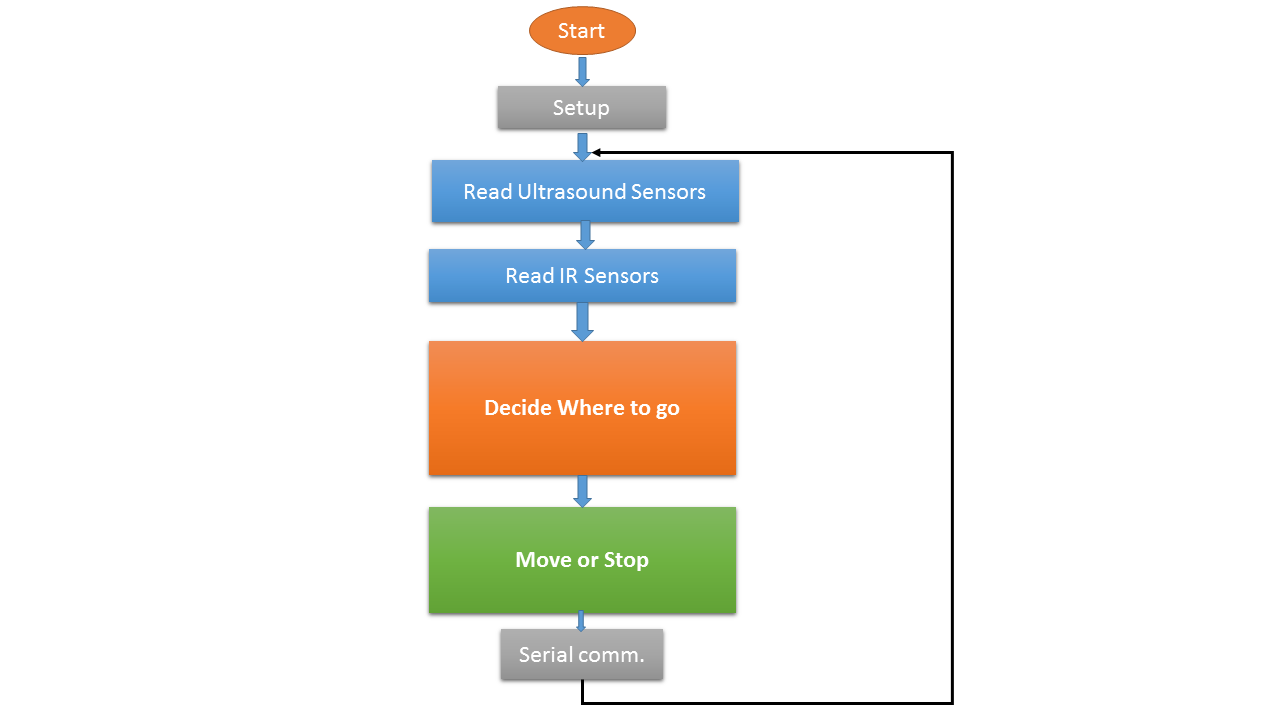
  • The second program was created to work with the front sensor working badly. This program also works by taking the measurement of the IR sensors and of the ultrasonic sensor in order to decide where to go, but the structure is a little bit different.
  • More specifically, the setup is the same. But there is no longer a switch case with different modes. The decision of where to go has been made in a function and the action (move or stop) has been made in another function.
  • The function to read ultrasonic sensors no longer looks for the maximum output. It only takes the values of the sensors.The function to read IR sensors stores the values of the three IR sensors and lit the LEDs if a sensor detects an obstacle.A function to send the readings of all 6 sensors has been added in order to facilitate the tests.

  •  

    Decision function

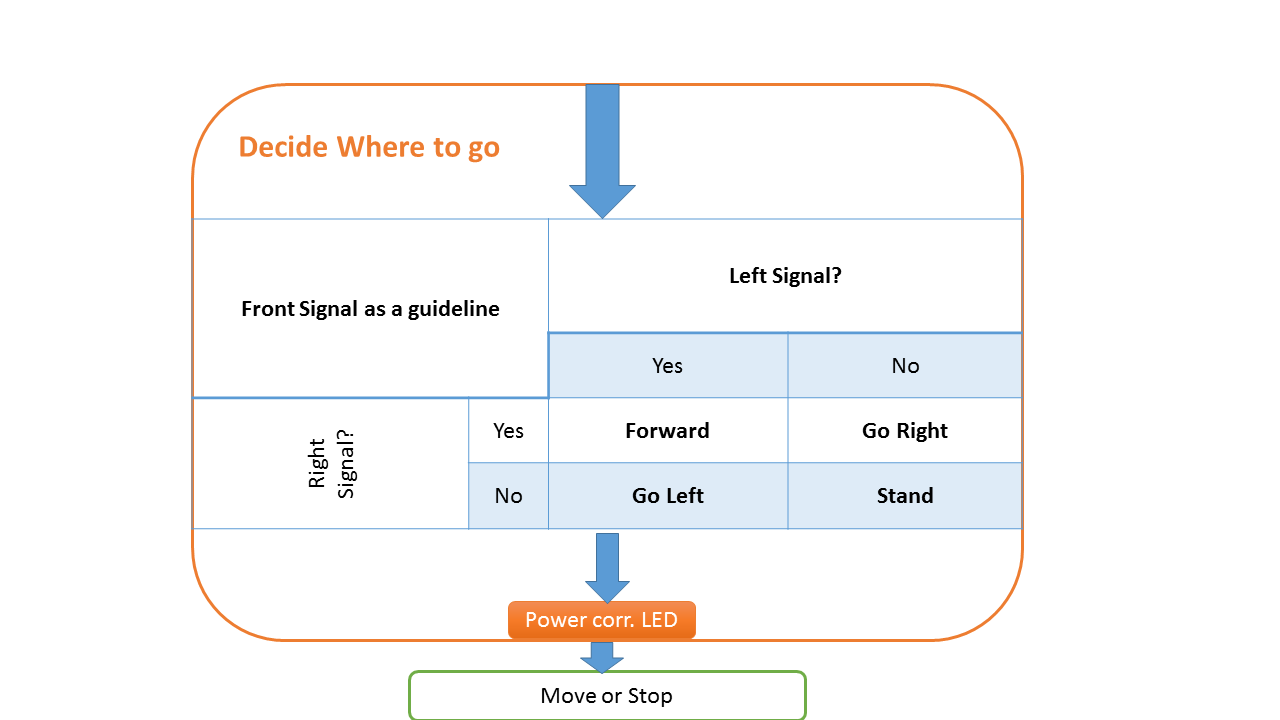
  • Since the front ultrasonic sensor wasn't working properly, the part of the code that decides where the trolley should go had to be revised. The front signal is used as a guideline. If both the left and right signals are higher than this guideline, the trolley should go straight ahead. If one side has a higher value than the other by a large margin, this is the side where the trolley should go. Else, the trolley stays still. LEDs are also lit to show what the trolley is doing.

  •  

    Action function

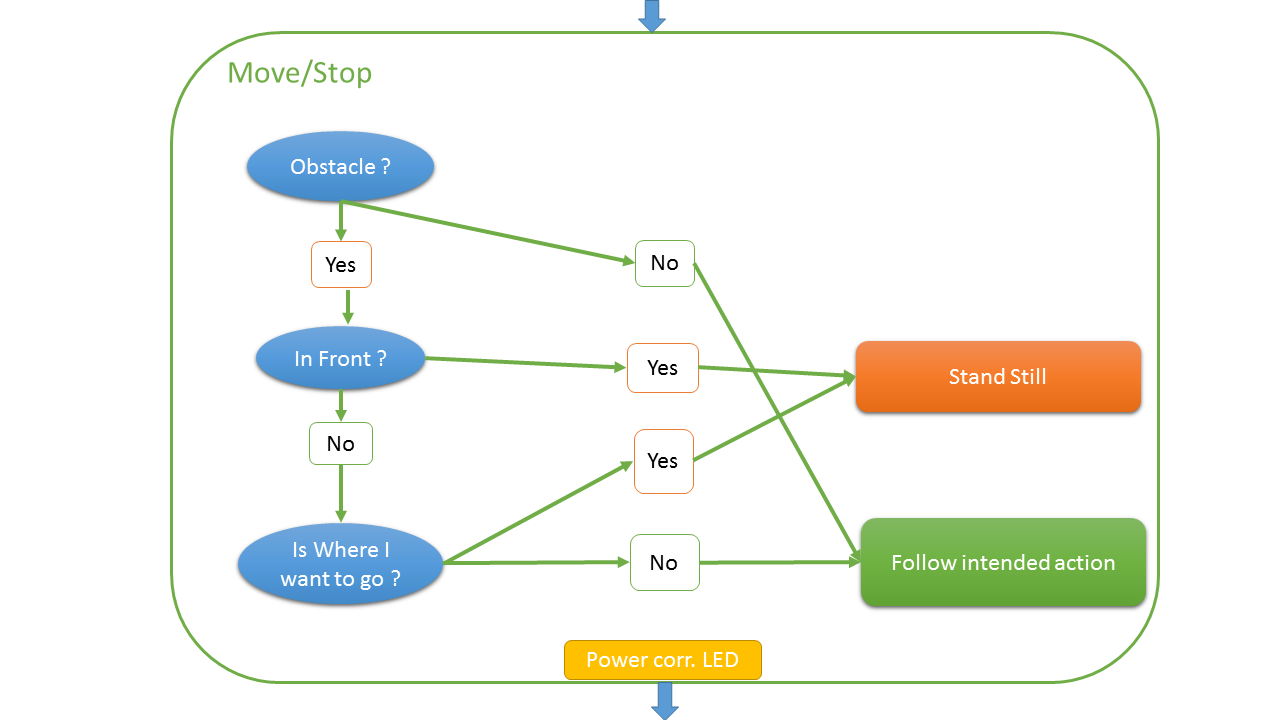
  • After the decision making function we have the action function. This function receives the direction where the trolley should go to and the value of the IR sensors. If there are no obstacles in front of the trolley or in the intended direction, the trolley will move according to the previous decision. If there are obstacles, the trolley will stand still or drive sideways to avoid collision. There are LEDs to show if the IR sensors detect an obstacle.

  •  
  • One last minute modification was also made. If the trolley detects no signal, it will spin in order to scan area in order to find the emitter.
  • The advantage of the code is that it works in the present case where the front sensor gives a small (bad) reading. The disadvantage is that it won't work if the sensors are working properly. The trolley will go forward only if both side ultrasonic sensors give a higher value. But if the front sensor is working properly, when the trolley should go forward, the front value will be higher than the other two. And thus the trolley will stand still when it is supposed to move.

The code for the second program is downloadable by clicking here

Cost

  • The following list is the approximated cost of the prototype:
  • 3 X IR Sensor €31,83
    3 X Ultrasound Sensor €15
    Ultrasound Emitter €7
    MDF Lasercut €1
    Plexi Lasercut €1
    Rotating Wheel €5,50
    64 x M2.5 screws & nuts €10
    2 x Futaba S3003 €21,2
    5 x 9V battery (price for 6) €10,67
    3D printing (Wheels, sensor holders) €10
    Other electronics €4,80
    Arduino UNO €20
    Total €138

     
  • Obviously a real size automated trolley would be more expensive mainly because of the motor cost, indeed, the prototype was very light but a fully loaded trolley would be very heavy which constitute a gain of inertia demanding higher motorized power. Also the battery of the real size robot would need to be bigger in order to feed those motors, a simple lithium 9V battery won't be enough anymore. That application seems then too expensive for a shop to propose to every client but is still a good idea to propose one or two robots for disable or old customer with reduced physical abilities since it develops the branding of that shop which takes care of them.

Future improvements

  • During the design process and the creation of the prototype, different ideas were found to enhance the system.
  • The first idea was to replace the ultrasound sensors by a webcam to track the target customer. In fact, there wouldn't be any kind of sound reflection problems anymore, but the problem of that solution is that we have to perform a video analysis algorithm which are usually very heavy and then, a more powerful microcontroller would be needed, which involves a more expensive cost of production.
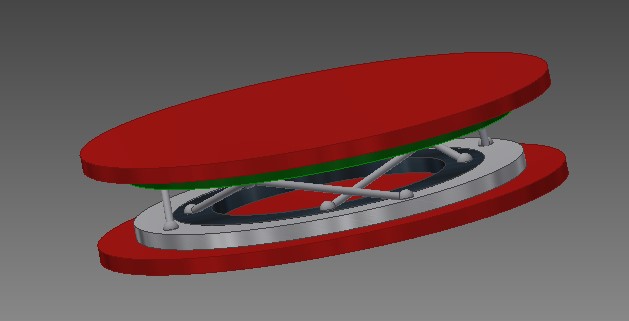
  • Another idea was to make a mobile platform on the trolley.

  •  
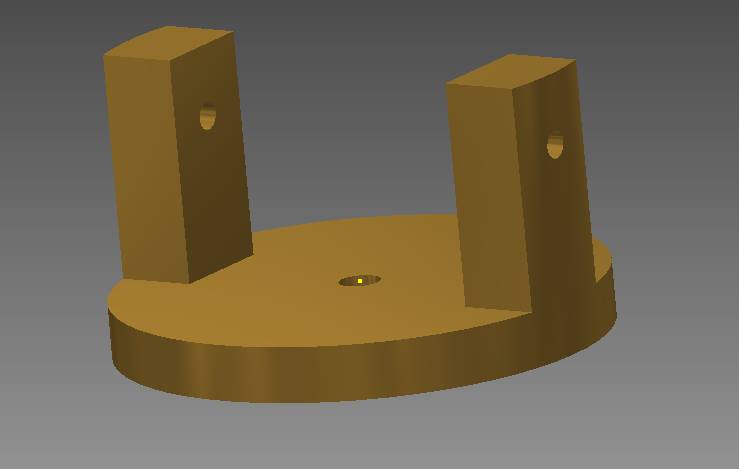
  • That would allow the customer to put articles in the trolley with no need to bend over since the platform is at high level (human level). But then an acceleration of the robot would be a risk of falling since high center of gravity constitutes instability. So the robot will retract the platform towards the floor and have a low center of mass in order to move in a safe and stable way. The problem is that the system would be an extra cost and consume more power. However, it would be a interesting challenge to consider. The concept above uses pillars that are fixed on two disks who turn in opposite directions. Since these pillars are all fixed on the platform, the rotation of the disks induces a vertical motion of the platform.
  • Finally the last idea was to improve the speed of the robot but it would then need bigger motors and an external breaking system to insure the same safety level, increasing again the production cost.

Our Amazing Team

Joining forces ...

David De Backer

Designer

Niels De Valck

Designer

Gabriël Van De Velde

Designer

Arnaud Fiala

Developer

Arsène Ouedraogo

Developer

Timeline

  • 27-Oct-2014

    An idea is Born

    Choose motors and obstacle detection method

  • 05-Nov-2014

    Completing idea

    Choose tracking and signal emitting method

  • 13-Nov-2014

    Electronics & Software

    Electronics on breadboard and Software for individual programs

  • 25-Nov-2014

    PCB & Design

    Technical drawings and PCB layout


  • Final


    12-Dec-2014

    Software finished


    13-Dec-2014

    Robot finished

Trouble-Shooting

Electronics

  • Once the PCB was build, output signals didn’t work as expected. A trouble shooting session had to be set in order to investigate and fix the source of the problem.
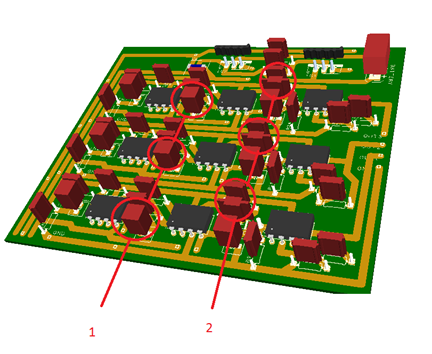
  • The first problem was the fact that a capacitor had the wrong value on the three rows of signals treatment (image, problem 1). That capacitor has the function of high pass filter of first order, initially designed with a cut off frequency of 40 kHz. Since the actual value was 10 pF instead of 1nF, the 40 kHz signal was not able to pass through that filter. This first mistake took time to find since every part of the circuit had to be tested with an oscilloscope.
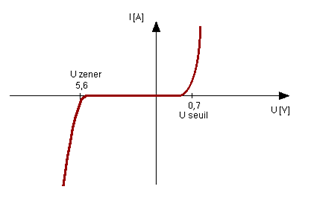
  • Then another error occurred. In fact the tension at the output of the 3 diodes was negative when exciting the circuit input. Those diodes have a function of rectifier of the amplified signal. It appears that the diodes where on the wrong sense and so the negative tension of the symmetric wave was able to pass through but not the positive one, as it is visible on the graph bellow. After switching diodes (problem 2) the PCB worked correctly and gave results similar that the protoboard.
    Image from: “http://etronics.free.fr/dossiers/analog/analog11.htm”
  • We have chosen to not make an extra pcb for the arduino because of a lack of time and we wanted to finish the project perfectly on time (for the first deadline)
  • On the other hand, a condensator on the pcb was that big, that one wasn't able to fit both pcb's above each other. The same was true for the two voltage regulators on the ultrasound card. We found an easy solution by bending both regulators and by drilling a hole through the arduino card so that the big capacitor wasn't restraining the cards to fit in the design.

Code

  • The code for controlling the trolley was made before the trolley was completely assembled. Therefore testing could only start once the robot was assembled and not immediately during programming. The trolley has 3 IR sensors and 3 ultrasound sensors. The program drives the 2 motors depending on the readings of the sensors.
  • The IR sensors were quite simple to use. They don’t have a lot of noise and don’t need to be amplified. So they didn’t cause a lot of troubles.
  • The same cannot be said for the ultrasound sensors. They have a lot of flaws and the program had to be changed to take in account all these flaws. First, they have a lot noise. A normal reading is about 800 when the sensor detects the signal of the emitter and the noise can reach up to 300 or 400. Furthermore, the noise level isn’t constant, as it goes from 0 to 400. It seemed as if there was somewhere a periodic external source of ultrasound and it didn’t come from the emitter that’s for sure. The second problem is that the front sensor gives smaller readings than what the other two sensors give. The program was initially looking for the direction in which the ultrasound signal was the highest and that means that the trolley would never go forward since the sensors of the sides always have higher reading the one in front. But this is a problem with the sensor, because the circuit is identical for all the sensors. Also some problems occurred when the amplifying circuit was badly connected.
  • The servomotors also caused a few problems. The first problem is that in order to stop the motors you have to send an instruction equal to the neutral point of the motor. The neutral point is usually 90 but after hacking the motors this neutral point changed. In order to be able to stop the trolley, the new neutral point had to be found. The second problem is that this neutral point kept changing depending on the voltage input in the motors, and they also kept changing for some other unknown reasons. The third problem was that in order to make the trolley go forward, instructions have to be given to the motors to make them rotate at the same speed. And of course the motors are slightly different so you have to manually find instructions that give the same speed. These instructions also changed depending on how the Arduino was powered up (by a battery or by a computer via a USB cable).
  • The implementation of LED for ‘signal detection’- feedback didn’t cause much problems. But the soldering of the LEDs on a small place did. Due to a little piece of the copper path that flipped over, touching another copper line, one LED wasn’t working. Finding this small error, took a long time.
  • In conclusion, using the IR sensors was easy, using the motors was more complicated as the values kept changing and using the ultrasound sensors was much harder due to the noise.

Miscalenous troubleShooting

  • Once the design was finished, the group was able to go to Fablab to 3D-print and laser cut the necessary parts. Since the battery clips weren’t taken into account inside the robot design, the batteries couldn’t fit properly. In order to catch this problem, some parts were laser cutted again. After going a second time to Fablab, for these few mdf-parts, the assembly went well.
  • The wheels of the Troll-E are ‘handmade’ with a 3D printer. This way, the speed of the robot could be tuned by designing the wheels. After assembly, during the first tests, some traction problems occurred. The wheels kept spinning on the smooth surface. To cope with this problem, rubber strips were glued on the wheels, to improve the contact with the ground. With this simple solution, the traction problem was quickly solved.
  • For emitting the ultrasound signal, a little PCB made and a few components, like the loudspeaker, were soldered on it. After a few days, a piece of the copper path on the PCB came loose from the plastic of the PCB. To solve this, the loudspeaker was de-soldered and glued to the side of the PCB. By use of little jumpers (small cables), the contact was made on a place where the copper path was still in place.
  • The whole design of the robot was made to be assembled with M3 screws and nuts. At the moment of the assembly, someone working in building Z used all the screws and nuts of size M3, so the whole assembly had to be done with M2.5 screws and nuts. This took some extra time, since the nuts could move easily and the robot was closed. Care was needed to keep the nuts in place while screwing.
  • After some testing, it appeared that the robot had a better response when the Arduino was connected with the computer. The pc was then feeding all the electronics. A rechargeable, external battery was used to solve this problem.

Personal impressions:
An enriching experience, contact us to know more :D .