
 Software
- Introduction
- Sharp Snsors
- Motor
- Lift Sensor
- Speaking
- Help Counter
- Layout of the Program
- Conclusion
- Code
Introduction
The software is essential in a mechatronic project. Indeed, it is the software that manages the actuators and reacts in function of the sensor's signals. The software makes it possible for the robot to react differently in function of its environment and adds functionalities to the mechanics of the robot.
We chose to use an Arduino board for our robot. This made the electronic and software simpler. To program an Arduino board is really similar to writing software in C++ or any similar language. It is almost a high level language of programming in opposition with writing software in assembler. The assembler language is directly related to the hardware. Generally, software written in assembler cannot be used for other hardware than the one it is written for. Moreover, Arduino is largely used and it is thus easy to find help and tutorials.
In this section, we will describe the general guidelines of the program we wrote and explain the devices allowing us to react with the environment (actuators and sensors).
 Sharp Sensors
For Schizo to be able to detect obstacles two Sharp sensor are used: one placed in the lower part of Schizo and oriented horizontally to detect obstacles and another placed in the upper part of Schizo and oriented downwards (see Mechanic part) to detect holes or cliffs. In the remaining part of the website, the Sharp for obstacle will be called SharpDown and the Sharp for holes will be called SharpUp.
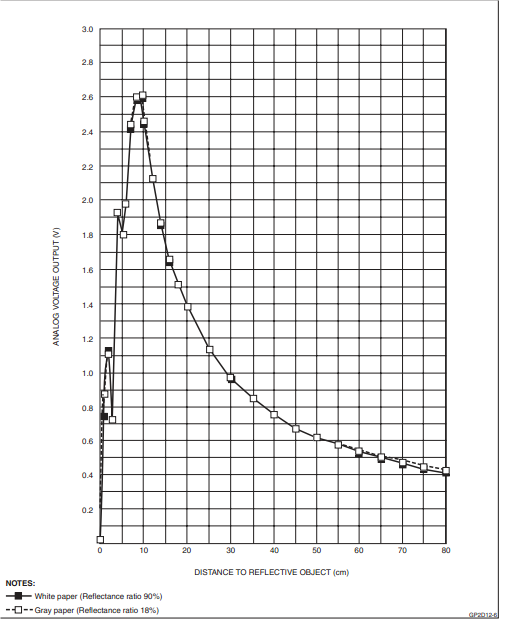
Data sent by the Sharp sensors are between 0V and 2.6V as we can see on following graph from the datasheet. These values correspond to a distance between 10 and 80cm. Values read by the Arduino on his analogue pins, are tensions between 0V and 5V. The analogue values are converted in 10 bit values, thus values from 0 to 1023 by the Arduino. In fact, we are not interested by the distance separating Schizo from an obstacle or hole in itself. But we would just like to know when an obstacle is in front of him and make him react in consequence before collision, typically by slowing down the motor. For this reason, we did not conceive an electronic circuit in order to use the hole range of values (0->1023).
Values that we will use are between 0.4 and 2.5V. We restricted the range of values we will use from 0.4 to 2.5 to have a one to one relationship between the voltage and the distance as we can see on the graph below. These values correspond to values from 82(=0.4V*1024/5V) to 512(=2.5V*1024/5V) for the Arduino.
When SharpDown detects an obstacle at a distance of approximately 80 cm, a function to slow down Schizo is called. Schizo will slow down. This procedure will be interrupted if the obstacle disappears (for example if someone walks past him). A similar procedure is used for SharpUp. If the value sent by SharpUp is greater than the value corresponding to approximately 40 cm, Schizo sees a hole and he will stop.
Motor
To control the Servomotor we normally have to send the duty cycle we want,to achieve the speed we want, to the motor and inside the motor a little microship regulates the motor. Because we tuned our motor to make it go from 0° to 360° we can't use this regulation. We can only chose between run or stop. The motor is connected to an analogue pin of the Arduino. Analogue pins used as output convert a value between 0 and 255 (8 bits) to a value between 0 and 5V. When we want the motor to stop we sent 0 to the pin, when we want him to run we sent 255.
Lift Sensor
Schizo has to know when he is being lifted to stop asking for help and stop the motor. To do so we used a limit switch detecting when the axis of the wheels is at the bottom of the sliding channel. This switch is connected to a digital pin of the Arduino. When the pin is at high it means that the axis is at the bottom and thus that the motor has to stop.
Speaking
This part is the most important of the project! Initially, the speech is our way to make to robot more human friendly. Another way could be to use an LCD screen but it is less friendly and above all less funny! We have recorded several samples of sound to respond to several situations. For example, he should be able to ask its way, thank people, complain, etc. He has also several samples of sounds during its schizophrenia time ... Samples of sound were chosen in very well known movies and recorded on an SD card. Samples would have been read by a waveshield for Arduino board that we used with a little speaker (see Electronic part).
However, we had a lot of problems with the electronic part of the waveshield. Unfortunately, we were not be able to fix the problem in time. We have chosen to use another solution: a simple 'bipper'. This solution is less complex and funny but is an emergency solution. When the robot needs help, Schizo bips S.O.S in Morse (... - - - ...). When someone helps him, he stops to make sound and leaves again.
Help Counter
To be able to compare the humanoid style to the robot style we made a help counter. For this, we used a binary counter controlling six leds. The binary number displayed by the leds is the number of times Schizo has been lifted, thus helped. The counter is controlled by a digital pin of the Arduino. To add one to the counter we put the corresponding pin to high for a few ms.
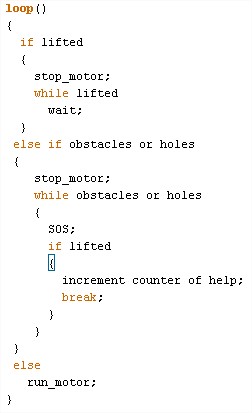
Layout of the Program
Conclusion
The final robot works correctly and fulfill the expectations of the project: two covers, one motor, interact with people. However, Schizo is maybe too slow ...
Code