Visual Basic
We have a microcontroller programmed in assembler which reads the inserted smartcard on the one hand and an Excel-database with the information of the allowed people at the other. There still needs to be a connection between both. This work is done by Visual Basic. The hardware for establishing this pathway is governed by the RS232 serial connecter and the Max232. Visual Basic manages the data received from the chipcard. The following section takes a closer look at how this is done.
Visual Basic

Documentation & Sources
Source code
Internet
Global Overview
First of all Visual Basic needs to set the connection between the PC and the microcontroller, for instance the baud rate, parity, data, and stop bit parameters have to be declared. Once a user inserts a chipcard in the smartcard-reader, the PIC microcontroller sends the account number in a consecutive way through the serial connection to the PC. This data is captured and stored by means of Visual Basic.
The following step in the process is to check if this number has a match in the Excel-database. If the same number has been found in the file, the program still needs to see if the actual date and time are within the allowed limits. When the “control-stage” is finished and the result is positive, the person is allowed to enter and his data is stored in a logbook. However, if one of the checks results in a negative answer, access is denied.
The Visual Basic code has a couple of main sections which will now be elaborated.
We were totally unfamiliar with Visual Basic so a share of research had to be done. This website taught us the very basics of the programming language and was a good help to get started. The needed objects and commands were found in the object browser of Visual Basic
The Code
The interaction between the user and the program code is governed by the Graphical User Interface or GUI. In the code we defined some public variables which are used throughout the entire program and every “Sub” (subroutine) has to get access to them. For instance the “CardNumber” and “FirstName” of the smartcard holder. Once the the main “Form” is loaded, the serial connection is set (see Global Overview). The serial port can be opened and closed by pushing a button in the GUI. This gives you more control on the whole event.

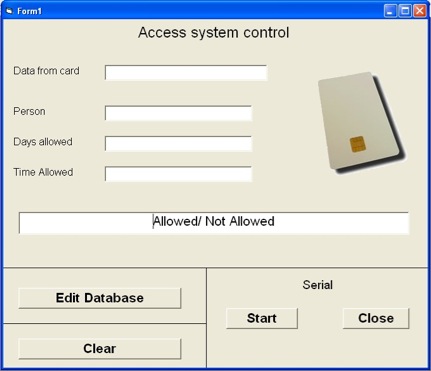
GUI
The graphical user interface helps the surveillance-crew to get a good overview of who is trying to enter the building and his allowed date and time. With the GUI you are also able to enter a new person in the database and manipulate the serial port connection. If wanted, the program could also be ran without, but we think that it contributes to a better handling and understanding of what’s happening.
Receiving the Card Number
When the PIC sends data, it needs to be captured. This is done by the Sub “MSComm1_OnComm()”. Every time there is a specific event, the sent data is first transformed in a hexadecimal number and then stored in a string called “Storage”. Once the length equals 16, the entire account number has been sent and the ID-number is known. To check for a match with existing ID’s, we took only the last 8 numbers because Excel or Visual Basic gives problems if we want to compare the whole thing. This can be justified by the fact that the first 6 numbers for bank cards are usually the same anyway.
Checking for a match
This is executed by the sub “sjeck”. As mentioned before, the database in Excel consists of the allowed people. First of all, the excel-object is created and then opened. Now we check if there is data present in the file, if so all the ID-numbers are placed in an array “IDnumbers” and checked for a match with the received “CardNumber”. When the same number has been found, the other information of the person is assigned to specific variables (“FirstName”, “StartDay”, “EndDay”,…). Next “sjeck2” is performed which controls if the day and time limits are not exceeded. Visual Basic has functions which give us the actual date and time (“Weekday” an “Hour). The result of these is an integer which does not represent a problem for comparing the hours but the day limits stored in the database need to be subjected to a conversion. The self-declared function “Conversion” accomplishes this task by turning a string, containing a weekday, into a number from 1 to 7. In both cases: check ok or not ok, a specific message is back sent to the PIC.
Result to PIC
We have 2 Sub’s “Send” and “SendNot”. Both use the function “ToSend” which takes care of the fact that always 16 characters are back sent to the microcontroller and, depending on the result, makes sure that the name of the person is centered on the LCD display. If the chipcard holder is allowed, the character “255” is transported to the PIC together with his or her firstname. If he or she doesn’t have

the permission to enter, “254” is sent. One will also notice the subs “AccessGranted”, “AccessNot1”, “AccessNot2”, … in the program code. These use the sub’s “Send” and “SendNot” and depending on what kind of “non-match” there has been found, set the text boxes on the GUI.
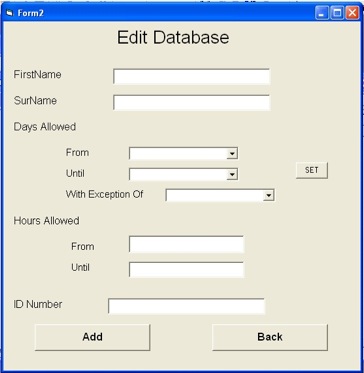
Edit the Database
The second Form in the Visual Basic code is activated by pushing the “edit database” button in Form1. This gives you the possibility to put another person in the database.
Excel
As mentioned previously, Excel provides us with a helpful tool to make a database and logbook. The information of a specific person is sorted in an certain way used in the program code (DataBase.xls). When one pushes the button, the excel object is created. By means of a command dialogbox, the user is asked which database file he or she wants to edit. We could also do this automatically and immediately fill out the file name in our code. But the followed way of working gives a brighter view on how things work and which steps are taken in the process. For commercial purpose one will obviously want to perform this automatically.
Once the file is selected, the program searches for the first available empty cell and fils in the person’s data.

Excel Database
